|
|
|
Bias Bindings |
|
Bias BindingA bias binding is a decorative finish of varying width that encases an edge On the edge to be bound, make a line of stay-stitching 3/4" from raw edge. Carefully trim away the 5/8" seam allowance - it's no longer needed since the edge is to be covered. If the edge is curved, shape the strip accordingly. Hand-Cut Bias StripRegular application Cut strip 4 times as wide as the finished width desired.
Pin or baste right side of opened-out strip to right side of garment, with raw edges even (be sure free edge of strip creases upward); if ends are to be joined, see at left before starting. Stitch along first crease (13). Fold strip up and to wrong side over cut fabric edges.
For a concealed machine finish, "stitch in the ditch"; roll the underside of the strip so the free creased edge reaches slightly beyond the line of stitching. With right side of garment up, "stitch in the ditch" - that is, on
Quick Topstitched This can be done with a sewing-machine attachment called a binder. Follow the directions that come with the attachment. French BindingThis is suitable only in sheer or very lightweight fabrics. Cut strips 6 times as wide as finished width desired. Fold the strip in half lengthwise, right side out. Press. Pin or baste raw edges of folded strip to right side of garment, all edges even; if beginning and end are to be joined, see BIAS BINDING before starting, but leave 3" free at ends and when joining, open out the strip completely. Stitch at a distance from the edge exactly equal to the finished width. Press the strip up; fold to wrong side over all raw edges.
For a concealed machine finish, see directions under "Regular application" (15). Packaged Bias StripsRegular application
1/4" finished width, using Double Fold Bias Tape. This is pre-folded with one side slightly wider than the other apply in the same way as the HAND-CUT BIAS STRIP, being sure to have the narrower side on top. 1/2" finished width, using 1" Single Fold Bias Tape. (Wide Bias Tape). On right side of garment, mark a line 1/4" from raw edge. Open out one fold of bias tape and pin or baste to the garment, right sides together, matching the raw edge of tape to the marked line. Then follow directions for HAND-CUT BIAS STRIP.
1/4" finished width, using Double Fold Bias Tape. With garment right side up, insert raw edge between creases of tape, narrower fold of tape on top. Topstitch (19). If ends must be joined, lap them (20).
Use 1/2" or 1" single fold tape, depending on finished width desired. Follow directions for Regular Application, but stitch tape first to wrong side of garment, then fold it over garment edge to right side, and topstitch in place (21).
Sewing From A to Z by Coats & Clark |
|
|
|
|
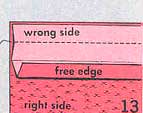 Pre-crease the strip for easy application. Fold it in half lengthwise, right side out; steam-press firmly; fold in half again, press.
 For a hand-finish, turn the free edge under on the crease. Slipstitch to line of stitching (14).
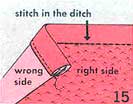 garment fabric but closely alongside the binding, so as to catch the creased edge underneath (15). Thread color, well matched to garment fabric, is important here.
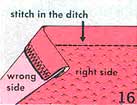 For a Hong Kong finish as an edge trimming where the inside will not show, cut strips a little narrower; do not pre-crease. Finish one edge with zigzag stitch. Stitch other edge to garment edge, right sides together. Fold strips to wrong side and "stitch in the ditch" on the right side (16) as described above.
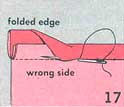 For a hand-finish, slipstitch folded edge to stitching line (17).
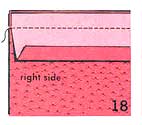 1/4" finished width, using 1/2" Single Fold Bias Tape. Apply in the same way as the HAND-CUT BIAS STRIP, with one fold opened out; on a packaged strip both creases turn upward, (18). For a concealed machine finish, do your first stitching within the seam allowance, close to crease. Otherwise, stitch on the crease.
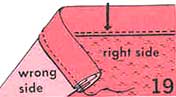 Quick Topstitched
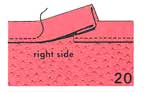 1/2" finished width, using 1" Single Fold Bias Tape. (Wide Bias Tape). Make it into a double fold by folding it in half lengthwise with one side slightly wider than the other; press. Follow directions in preceding paragraph.
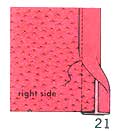 Regular Topstitched