|
|
|||||
Buttonholes |
|||||
|
Buttonholes are basically slits cut through the fabric. The raw edges of a slit may be finished with fabric (bound buttonhole), or may be worked over with thread by machine or by hand (worked buttonhole)Buttonholes are usually horizontal or vertical; occasionally, to carry out a design, they may be diagonal. For Successful Buttonhole Making
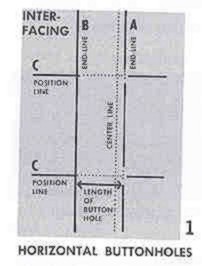
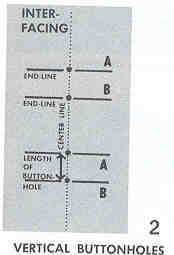
Possible re-spacing— If you have altered the length of your pattern, the buttonholes may need to be re-spaced. As a general principle, the top and bottom buttonholes should be placed at their original distance from the top and bottom edges of the garment. The buttonholes between are then re-spaced to be at equal distance from each other. Length of buttonhole— Buttonhole markings on a pattern indicate the buttonhole position. They do not indicate the buttonhole length, which is determined by the button. Measure diameter and thickness of your button: as a general rule, the two added together equal the necessary buttonhole length. (For instance, a button 7/8” in diameter and 1/8” thick needs a 1” buttonhole.) TIP: Make a test buttonhole check, especially for buttons that are fabric covered, dome-shaped, ball-shaped or of some unusual shape. Cut a slit in a swatch of your fabric, and try the button in the slit. Lengthen the slit, if necessary, until the button slides through easily. The length arrived at is the one you will mark on the interfacing. MarkingMarkings for buttonholes must be on the outside of garment, since that is where the greater part of the buttonhole is made. Since dressmaker’s tracing paper leaves permanent marks, the marking is done in two steps, the first one on the interfacing, and the second by basting through to the right side. Marking the Interfacing— Using dressmaker’s tracing paper and a ruler, transfer centerlines and buttonhole markings to the interfacing (if interfacing is woven, make sure the center line is on grain). Using pencil and yardstick, add the following lines to ensure correct and uniform buttonhole length:
Pin marked interfacings to wrong side of corresponding garment sections, matching edges exactly. Marking the Garment Section — Many fabrics can be marked with machine basting. Others (taffeta, polished cotton, certain treated fabrics) which show needle marks, must be hand-basted with a fine needle. On the side where the buttons will be, baste-mark the centerline only.
The Worked Buttonhole In a worked buttonhole, whether made by hand or by machine, the raw edges are worked over with thread. Worked buttonholes are made on the outside of a garment after the facing has been applied. Secure the facing in place with pins or basting near buttonhole markings until the buttonhole slit has been reinforced and cut. Always make a test buttonhole. Machine-Worked Buttonhole The machine-worked buttonhole is always suitable in casual and children’s clothes, which are washed frequently. A good machine-worked buttonhole should have stitches close together, forming a satin stitch, stitches even in depth, and lips just a thread apart so they do not fray when cut open. For a stronger, better-looking buttonhole, stitch around a second time. On a machine where you can control the length on the buttonhole, do this second stitching after slitting the buttonhole (hold lips a hair’s-breadth apart).When slitting a buttonhole open, first run the point of the scissors or seam ripper backward between the lips; this will help to separate the threads before slashing. Place a straight pin across each end of the buttonhole. This will protect the ends from being cut. |
|||||
|
|
|||||
|
|