|
These directions are for women’s pants with a fly front, which laps right over left. For a man’s fly front, follow the order of the directions but lap left over right. The number of each paragraph below accompanies the correspondingly numbered picture.
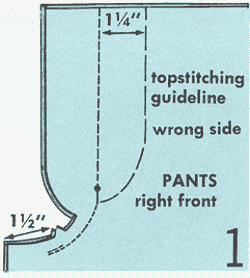 1. Join the two front sections as follows: 1. Join the two front sections as follows:
- Starting 1” from inseam, stitch to the bottom of zipper opening and back tack.
- Machine baste the remainder of opening.
- Clip basting threads every 2” for easy removal, if desired.
- Press seam open above the crotch curve.
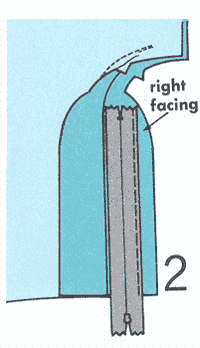 2. Position the work with the top of the pants facing you, the bulk of the work to the left, and extend the right-hand facing 2. Position the work with the top of the pants facing you, the bulk of the work to the left, and extend the right-hand facing
- Pl ac e th e cl o s ed zipper face down onto the extended facing with the edge of the zipper tape along the basted seam, and the zipper stop at the point where the first seam was back-tacked.
- Machine baste the right-hand edge of the zipper tape to facing.
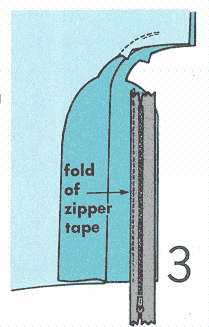 3. Turn the zipper face-up by folding the zipper tape along the basted line, and pin the free edge of the zipper tape to the facing 3. Turn the zipper face-up by folding the zipper tape along the basted line, and pin the free edge of the zipper tape to the facing
- Edge-stitch the fold of the zipper tape and remove pins.
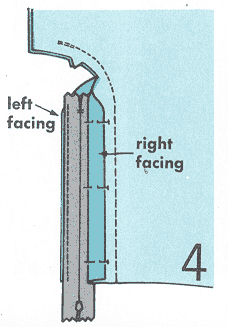 4. Move the bulk of the work to the right, and extend the left-hand facing. 4. Move the bulk of the work to the right, and extend the left-hand facing.
- Fold and pin back the right-han d facin g to kee p it out of the way.
- Place zipper tape face-down on left-hand facing.
- Machine baste the free edge of the zipper tape to the left-hand facing.
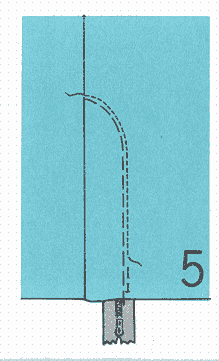 5. Spread work flat with right side up 5. Spread work flat with right side up
- Working from the right side, pin zipper in place along topstitching line.
- Topstitch, removing pins as you go along, leaving long tails of thread at the bottom.
- On inside, unpin folded-back facing. Bring thread ends to inside and knot.
- Remove basting at fly edge and press.
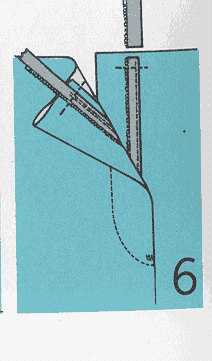 6. To finish the zipper 6. To finish the zipper
- Worki ng on the right side, make a bar tack at the botto m of zippe r openi ng throu gh all layer s of fabric, inclu ding the facing.
- If zipper is longer than the opening, open zipper, stitch across each tape at waist edge, and cut off excess.
Reference: Coats & Clark, Sewing from A to Z
|