|
Page 2 |
|
Linings |
|
Lining a Jacket or CoatTo line a jacket or coat, for which your pattern does not provide lining pieces or instructions, follow the directions below.
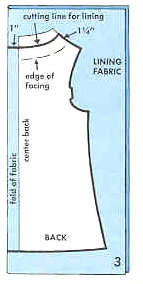
Back-Use the garment back pattern - the necessary changes can be made directly on the fabric. A lining in a tailored jacket or coat requires extra ease in the back. To provide this, place the pattern on the folded fabric, with center back 1” from fold. Front - For this, the lining will need a new pattern piece. Place pattern for facing over pattern for front and mark edge of facing on front pattern. On a sheet of tissue paper, trace the remaining part of the front pattern, adding 1¼” at marked edge of facing, as shown (4). Cut out. Cut two from lining fabric. Sleeves - Cut from garment pattern.
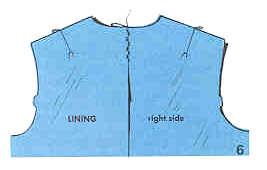
Baste a 1” pleat at center back (5) and press it to one side. Fasten upper end of pleat with a few catch-stitches (6). Catch-stitch pleat at waist level in the same way. Stitch darts halfway, as shown (5). Assemble the lining completely, joining all seams and setting in sleeves.
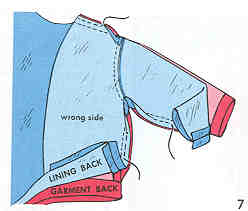
Attachin g the Lining This is done after facings have been attached to the garment and the garment and sleeve hems have been completed. By hand - Have garment and lining wrong sides out. Pin the back of the lining to the back of the garment; wrong sides together, seams matched with open seam allowances on top of each other, as shown (7). With a loose basting stitch, catch one lining seam allowance to one garment seam allowance exactly as shown. Join seams in this manner at shoulder, on sleeves to below elbows, and at side seams to hipline.
Now put both your hands inside the lining and through the two armholes, reaching down into the lining sleeves. On both sides at the same time, grasp bottoms of lining and garment sleeves together. Pull sleeves through, turning body of lining over the garment. The entire lining will now be right side out, with the garment inside. Fold under the seam allowance on front and neck edges of lining and pin to facing 5/8” from edge. Beginning and ending 3” from garment hem, slipstitch lining to facings. By machine - Place garment and lining right sides together, lining sleeves inside garment sleeves. With shoulder seams matched and raw edges even, pin or baste front and neck edges of lining to facings. Stitch, beginning and ending 3” from garment hem. Turn to right side. Catch the seam allowances together as for a dress with sleeves. |
|
|
|
|
|
|
 Cutting the Lining
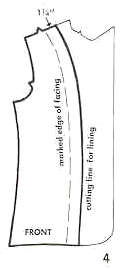 Cut out, mark darts if any, and remove the pattern. Pin the neck facing pattern to top of folded lining, shoulder and neck edges even. Mark lower edge of facing with chalk; remove the pattern. Measure and mark another line 1½” above chalk line, as shown (3). Cut out the neck on this line.
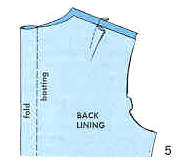 Assembling the Lining