|
Page 3 |
|
Linings |
|
HemsAs a rule, in a jacket the lining hem is attached to the garment hem, while in a coat it hangs free. This, however, is a matter of choice. In sleeves, the lining is always attached. TrimmingThis is strictly optional, but you may, for a finishing touch, wish to add a line of decoration where the lining joins the facing of a coat or jacket. It can be done in one of two ways: Rick rack or piping can be inserted in the seam by machine-stitching it to the lining before the lining is attached to the garment (see PIPING). Narrow braid or ribbon can be blind-stitched over the seam after the lining is attached. Lining Reaching to Garment EdgeThis is for a garment with a front opening, such as a coat, jacket or vest, where the lining reaches to and finishes all edges. Cutting and Assembling Cut the lining from the garment pattern, omitting any facings (remember that facings have already been omitted on the garment). Assemble garment and lining completely, joining all seams and setting in sleeves, but leaving all edges unfinished. Attaching the Lining a. On both the garment and the lining, mark the hemline and cut away hem allowance 5/8” from marked line (remember that this makes it impossible to lengthen the garment later). b. With lining and garment right sides together and seams and darts matched, pin and stitch around neckline and front opening edges; trim and clip seam allowances; understitch. c. Stitch the bottom edge, leaving an opening as shown (8) through which to turn garment. Press this seam open; trim corners and grade seam allowance.
e. Push the garment through the opening at bottom and bring it right side out. Reach inside the garment sleeves and through the lining sleeves; grasp the ends and pull the lining through. Slipstitch the opening together. Press garment edge so that lining will not show on right side. To finish sleeve hems, see step d (see ATTACHING LINING). On a sleeveless garment, stitch the lining to the armholes and complete with facings. Garment With BindingCut the lining from the garment pattern, omitting any facings (remember that facings have already been omitted on the garment). Assemble both garment and lining completely, joining all seams and setting in sleeves, but leaving all edges unfinished. Leave lining wrong side out. On both garment and lining, cut off the entire seam allowance (and hem allowance) on edges to be bound. Place the lining inside the garment, wrong sides together, the way it will be worn, lining sleeves inside garment sleeves. Matching edges, seams, darts and markings, pin lining in place. Baste together 3/8” from edges, leaving an opening of about 10” at bottom edge. Reaching through the opening, catch seam allowances of garment and lining together at shoulder and side seams as directed for a dress with sleeves; see step e see ATTACHING LINING). Then baste the opening together and apply the binding. Look in: Learn to Sew 2000 |
|
|
|
|
|
|
|
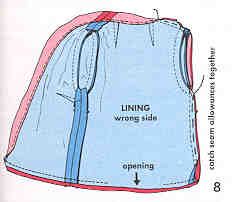 d. Catch seam allowances of garment and lining together at shoulder and side seams as follows: reach in between the lining and the garment and bring the front edge of the garment inside the lining until the seam allowances of one side seam on garment and lining can be placed together. Catch one seam allowance to the other with a loose basting stitch (8). Repeat on the other side seam. Catch lining and garment together at shoulder seam allowances (8).