|
 Personalize this project with designs that reflect family memories. Personalize this project with designs that reflect family memories.
Materials and Supplies
- 17" x 29" white poplin fabric
- 17" x 16" white poplin fabric
- 17" x 10" white poplin fabric
- 1-1/2 yards of Christmas print fabric for border and backing
- 3/4 yard of decorative cording
- 8" x 8" square of green felt
- /2 yard batting
- Several scraps of fabric for tree trunk, pot, and star appliqués
- 25 half-inch Velcro circles for ornaments
- Water-soluble pen or chalk for marking fabric
- 1/2" x 16" wooden round dowel
- 25 one-inch embroidered ornaments (made or purchased)
- Fabric glue
- Brother Embroidery Cards #28 (Christmas), #39 (Doll Face) & #57 (Large Christmas)
Level of Difficulty: Intermediate
These project instructions are specific to the Brother ULT2001 Sewing/Embroidery machine; however, the project can be adapted for use on other machines. Small purchased appliqués or buttons can be used for the designs.
Instructions
1. Start with the white 17" x 16" poplin. Fold and press in half so the square measures 16" x 8-1/2". Using a decorative stitch, stitch 1/2" from folded edge, from one side to the other. Place this large pocket on top of the 17" x 29" piece of white poplin, making certain raw edges of pocket are even with the bottom of the calendar.
2. Make second pocket with the 17" x 10" fabric as follows. Fold and press in half so pocket measures 17” x 5”. Using decorative stitch, stitch 1/2" from folded edge. Line second pocket up with bottom edges of calendar and large pocket. Baste pockets in place using a 1/4" seam. Stitch down center of pockets though all layers, securing pockets to calendar.
3. Cut tree from green felt. Cut tree trunk and base from other scraps. Center them between the top of the pockets and 5” from the top. Stitch all pieces in place with a satin stitch or an appliqué stitch. Embroider star from Brother card 57 on top of tree (or use purchased appliqué or button).
4. Using a decorative stitch and thread (such as a gold or silver metallic), sew a garland effect across tree.
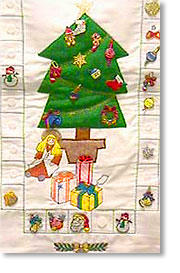
5. Three inches down from the appliquéd tree base center, mark the five boxes for the ornaments with water-soluble pen. In example photographed, 1-1/2" square boxes were used. Continue to mark the other 20 boxes (10 on each side of tree) vertically. Use a decorative stitch and thread to sew on all the lines as seen in picture.
6. Using the soft side of the Velcro, stitch a piece in each square. This will hold the ornaments in place until they are placed on the tree. Glue corresponding Velcro to the ornaments.
7. Cut two 16" x 1-1/2" strips, and two 33” x 1-1/2” strips all from backing fabric. Sew one short strip to the top of the calendar and one short strip to the bottom. Press. Sew the two 33"-strips down each side. Press.
8. The batting fabric and backing fabric are cut to the width and length of the calendar. Baste the batting to the wrong side of the backing fabric around all four edges. Lay calendar face side up on flat surface. Pin cording in place (make sure the raw edge of the cording is even with the raw edge of the calendar and the rest of the cording is on the calendar). Place backing wrong side up on top of calendar. Secure all layers with pins. Stitch around all four sides leaving a 4"-opening for turning calendar right side out. Slip dowel into the calendar, placing at top for added support. Hand stitch or machine stitch in place. Finish by hand sewing the 4" opening closed.
Developed by Keri Morales, Senior Education Consultant
11/04
|


