|
 For lounging in front of the television or curling up to read a book, use this comfortable bean-bag chair. Although the name implies that the bag is filled with beans, it’s actually filled with polystyrene pellets, making the chair light-weight and moldable. It’s easy to make either a child-size or adult-size bean-bag chair. For lounging in front of the television or curling up to read a book, use this comfortable bean-bag chair. Although the name implies that the bag is filled with beans, it’s actually filled with polystyrene pellets, making the chair light-weight and moldable. It’s easy to make either a child-size or adult-size bean-bag chair.
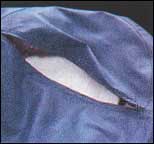
For added durability, the bean-bag chair consists of a muslin inner lining that holds the pellets, and an outer cover. The inner lining is zippered for convenience in filling the bag. The outer cover is also zippered, making it easy to remove for laundering or dry cleaning. For the outer cover, select a medium-weight fabric, such as wide-wale corduroy, denim, canvas, or upholstery fabric.
Materials
Pattern
For adult-size chair
- Medium- to heavy-weight fabric for outer cover:
- for fabric 45” to 48” (115 to 122 cm) wide: 5 yards (4.6m)
- for fabric 54” to 60” (137 to 152.5cm) wide: 3-1/2 yards (3.2m)
- Muslin for lining, yardage same as for outer cover
- Zipper, 22" (56cm) long
- Polystyrene or plastic pellets, approximately 6 cu. ft. (1.85 cu. m). Note that more may be needed depending on the size of your bag. Check online (we suggest Amazon.com) or with doll stuffing suppliers, packing suppliers or upholstery suppliers for sources.
- Other suggested filler to use would be packing peanuts. Use the ones that DO NOT dissolve with water
- 1" (2.5 cm) grid, such as cutting mat or graph paper
For child-size chair
- Medium- to heavy-weight fabric for outer cover:
- for fabric 45” to 48” (115 to 122cm) wide: 3 yards (2.7m)
- for fabric 54” to 60” (137 to 152.5cm) wide: 2-1/2 yards (2.3m)
- Muslin for lining, yardage same as for outer cover
- Zipper, 18" (46cm) long
- Polystyrene pellets, approximately 4 cu. ft. (1.27 cu. m)
- 1" (2.5cm) grid, such as cutting mat or pattern paper
Making the Pattern
Using the pattern, make a side pattern piece for the size of bean-bag chair you wish to make (adult or child). The pattern is provided on a grid that is scaled: one square on the grid is equal to 1 square inch (2.5 square cm). To make a full-size pattern, place tracing paper over a 1” (2.5cm) grid, such as a cutting board; or make a grid by drawing lines 1” (2.5cm) apart. Then, using the scaled pattern for reference, draw the outer (cutting) line of the pattern. (See Step 1.) Note: The adult-size chair is approximately 41-1/2” (105.4cm) long and 21” (53.3cm) wide at the longest and widest points. The child-size chair is approximately 34” (86.4cm) long and 16” (40.6cm) wide at the longest and widest points.
To make a pattern for the top of the bean-bag chair, fold a piece of paper in half; mark a point approximately half-way down the folded edge. Using a ruler and pencil, draw an arc measuring 5-1/2” (14cm) from this point for the adult-size chair, or 4-1/2” (11.5cm) for the child-size chair. Hint: keep the end of the ruler at the point marked at the fold, and pivot the ruler in an arc while marking at the measurement indicated above. (See Step 2.)
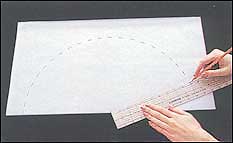
To make a pattern for the bottom of the bean-bag chair, fold paper in half as in Step 2, and make an arc measuring 12” (30.5cm) from the marked point for the adult-size chair, and 10” (25.5cm) from the marked point for the child-size chair. Unfold the paper and mark a line 1/2” (1.3cm) on one side of the fold. Cut along this line and discard the smaller side of the circle. The remaining piece is the pattern for the bottom of the chair. (See Step 3.)
Cutting Directions
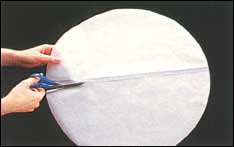
- Using side pattern, cut 6 fabric and 6 lining
- Using top pattern, cut 1 fabric and 1 lining
- Using bottom pattern, cut 2 fabric and 2 lining
How to Sew a Bean Bag Chair
|
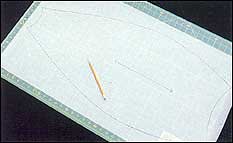
1) Side Pattern. Place tracing paper over a 1" (2.5cm) grid. Make full-size pattern for chair side sections, using the printable, scaled pattern as a guide
|
2) Top Pattern. Fold paper in half; make a mark approximately half-way down fold. Using ruler and pencil, draw arc on paper measuring from the marked point out the indicated distance. Cut on drawn line and unfold paper for top pattern.
|
|
3) Bottom Pattern. Draw arc for bottom pattern and unfold paper; draw a straight line 1/2" (1.3cm) on one side of fold. Cut on this line, and discard smaller side of circle. The remaining piece is pattern for bottom of chair.
|
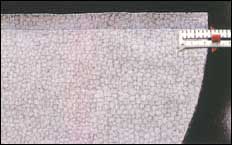
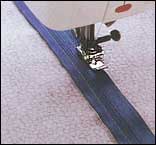
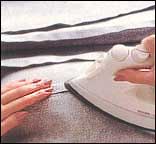
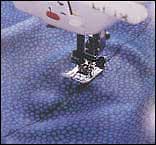
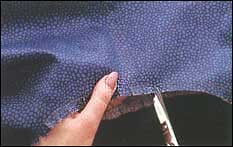
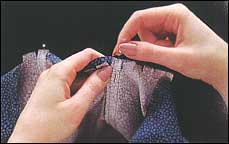
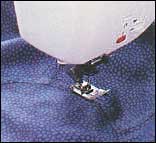
4) Pin chair bottom pieces, right sides together, matching straight edges. Machine-baste straight edges using a 1/2" (1.3cm) seam allowance. Stitch again using a regular stitch length, but only stitching 1" (2.5cm) in from each edge. Press seam open.
|
|
|