|
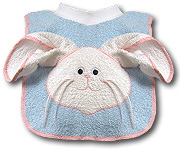 A washcloth is pulled through openings to form the bunny’s ears – and it’s handy for cleaning up! A washcloth is pulled through openings to form the bunny’s ears – and it’s handy for cleaning up!
Materials and Supplies
- Brother Sewing Machine
- Binder Foot (SA109)
- 18” x 11” piece terry cloth for bib
- 10” x 10” piece terry cloth for washcloth
- 6” x 6” terry cloth for bunny face
- 4”-wide x 14”-long piece ribbing for neck opening
- 3/4 yard cotton print for binding
- All-purpose thread to match cotton print
- Fusible interfacing
- 1/2 yard of ribbon for whiskers
- 2 eyes (or use built-in machine stitches for eyes)
- Pom-pom for nose (or use a satin stitch to create a nose)
- Bunny face pattern
This project is specific to a particular brand of sewing machine, notion, fabric and/or supply. However, the project may be easily adapted to other brands.
 Cutting Instructions Cutting Instructions
1. Cut the terry fabric for the bib 18” x 11”. Curve the corners.
2. Cut an opening for neck and head in the bib.
3. Cut the terry fabric for the washcloth 10” x 10”. Curve the corners.
4. Using the bunny face pattern and terry fabric, cut out the bunny face appliqué.
5. Cut strips of the cotton print fabric to be used for the binding on the bias and 1” wide.
6. Cut ribbing 4” x 14” (greatest stretch along the length) to finish the neck edge.
Sewing Instructions
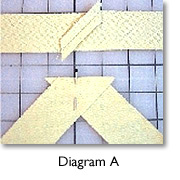 1. With right sides together, stitch the bias strips together using a 1/4” seam allowance to form one long strip of bias. Press the seams open. (See Diagram A) 1. With right sides together, stitch the bias strips together using a 1/4” seam allowance to form one long strip of bias. Press the seams open. (See Diagram A)
2. To bind the edges of the terry washcloth and bib, set up the binding foot as follows: Before attaching the binding foot to the machine, feed the unfolded bias binding strip through the back of the foot. It may be necessary to use a long narrow object to push the bias strip through the inside of the foot to get started. Pull the bias strip out the rear of the foot.
3. Attach the foot to the machine and select either a straight stitch or a zigzag stitch. (A zigzag stitch was used in the sample.) If the needle is not positioned properly over the bias tape, loosen the position screw on the binder foot and slide the guide to the left or right to align the tape with the needle.
4. Slide the edge of the bib fabric in the groove on the foot and position under the needle. Guide the bib fabric and the bias binding so it covers the edge of the bib as you sew.
5. Stitch the bias binding around the terry cloth fabric for the washcloth just as you did for the bib.
6. To finish the neck opening, stitch short ends of ribbing together using a 1/4” seam allowance. Fold in half lengthwise, wrong sides together. Mark the circle of ribbing in quarters; mark the neck opening on bib in quarters; then pin the ribbing to the neck opening, matching pins and having right sides together. Stitch, using a zigzag stitch and stretching ribbing to fit neck opening.
To Create the Bunny Face Appliqué
1. To provide extra stability for the bunny face, iron fusible interfacing to the wrong side of the appliqué piece.
2. With a fabric marker, mark the area that will be open for inserting the washcloth for the bunny ears.
3. Set your sewing machine for satin stitch and stitch along the edge of the open area.
4. Position the eyes, pom-pom for nose, and ribbon for whiskers on the bunny face appliqué piece. Stitch in place.
5. Place the appliqué face on the bib and satin stitch around the edge to attach it to the bib. Be sure to leave the top areas open where you had previously sewn the satin stitching.
6. To create the bunny ears, insert the finished washcloth through the top openings on the bunny face appliqué.
Created by Carol Bell, Education Consultant
3/05
|


