 Supplies Supplies
(For a 26” - 28” Necklace)
- Serger cording foot
- 80 -100 assorted flat or shank-style buttons
- 1 - 2 spools of heavy decorative thread (for upper looper)
- 2 cones of coordinating serger thread (for needle and lower looper)
- 1 reel of 6# clear fishing line
- Small scissors
- Tape measure
- Jewelry or small nosed pliers
Jewelry findings:
- Two 1 1/2”-2” eye pins
- One clasp set of choice
- Two jump rings
- Two cone ends
- Clear nail polish
- Twist ties
Machines
- BERNINA® serger
- Most other sergers with cording foot
These project instructions are specific to a Bernina machine; however, the project can be adapted for use on other machines.
Serger Settings
- 3-thread rolled hem stitch:
Right Needle: Serger thread – tension 6
Upper Looper: Decorative thread – tension 7
Lower Looper: Serger thread – tension 7
- Stitch Length: 1.5mm
- Cutting Width: 1mm
- Roll hem lever engaged
- Rotate the knife to a non-cutting position
Note: Tension settings are approximate and may need to be fine tuned for individual sergers.
Test Serge a Strand
Lower the presser foot; hold all three thread tails taut and serge for approximately 12”. Check to see that the stitches are uniformly serged, smooth, and rounded.
If the chain is bumpy: Lengthen stitch length.
If the chain is flat, not rounded: Check to see that all thread guides are threaded.
Tighten lower looper; loosen upper looper. Slightly tighten needle. Check to see that the cutting width is set at 1.
If the chain jams at beginning: Hold taut when beginning to serge.
Serging the Chains
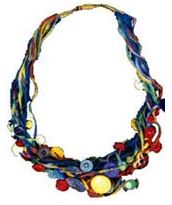
Note: The necklace is made of 15 strands, 10 with buttons, and 5 without. Serge each strand until it is approximately 36” in length for a finished length of 26” - 28”.
Thread 8 to 10 buttons onto fishing line, leaving the line connected to reel, and placing the reel and buttons in your lap. Serge 3” - 4” of chain, then insert the fishing line to the right of the needle and to the left of the outer edge of the serged chain. While holding the thread chain and fishing line behind the foot, begin to chain over the fishing line, incorporating it into the strand.
Chain a 10” strand, with the fishing line included. Stop, lower needle into machine to hold the place in the chain. Raise the presser foot and swing 2” - 3” of fishing line to the left of the foot, out of the way of the chain. Slide up the first button.
Lower the presser foot, and chain 4 - 5 stitches without the line included. Raise the foot and swing the fishing line back into the original chaining position.
Lower the foot, and once again including the fishing line, chain for about 2”. Pull down on the loop created by the fishing line when it was out of the chain. This will snug the button up against the serged chain.
Repeat the previous steps to add additional buttons onto the strand for a length of 16”. Chain an additional 10” without buttons, for a total of 36”. This completes the first strand.
Serge 9 more strands with buttons.
Serge five 36”-long strands with fishing line but without buttons, using the same settings as with the button strands.
Assembling the Necklace
On a flat surface, arrange all 15 strands atop each other. Using twist ties, temporarily tie each end 2” - 3” from the last button. Twist the necklace several times to blend strands. Hold and mark the desired length.
Bend each eye pin into a circle by placing its straight end inside the eye. At your desired ending point on each side of the necklace, insert all 15 strands into the resulting loop. Using jewelry pliers, pull down on the straight end of the eye pin, tightening the loop around the strands. Fold the excess of the strands toward the necklace, having the straight end of the eye pin pointing away from the necklace body.
Using a double length of thread, tightly wrap the strands right next to the eye pin; knot the thread and coat with clear nail polish. When dry, clip the excess strand tails close to the wrapping.
Insert the straight end of the eye pin into the hole in the cone end, and then pull the cone down to hide the wrapped necklace end inside the cone. Form a loop with the excess wire of the eye pin, and attach it to a jump ring. Remove twist ties.
Repeat for the opposite side.
Attach the jump rings to each side of the necklace clasp to complete the necklace.
by Nancy Bednar.
9/03
|


