|
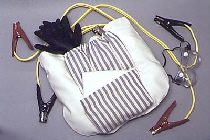 Tidy up your trunk with this handy battery cable and accessories bag. Put all the supplies you need to jump-start a battery in one place. Pockets are provided to place safety goggles (chemical splash type), gloves (neoprene or rubber), battery post cleaning tool, and fender cover. Skill level: Beginner Tidy up your trunk with this handy battery cable and accessories bag. Put all the supplies you need to jump-start a battery in one place. Pockets are provided to place safety goggles (chemical splash type), gloves (neoprene or rubber), battery post cleaning tool, and fender cover. Skill level: Beginner
Supplies
- 1/2 yard of rubber sheeting
- 19" x 36" fabric for bag (use a heavy material such as denim, duck, twill, or canvas)
- 8-5/8" x 20-1/4" contrasting fabric for upper pocket (use heavy material)
- 9" x 13" contrasting fabric for lower pocket (same as upper pocket)
- 3/4-yard 1/4" polyester elastic
- 18" sew-on Velcro™
- Fray Check ™ or Stop Fray™
- Construction thread
- Size 90 universal needle
- Washable marking pen
- Ruler
- Pattern
Equipment
Any Elna sewing machine recommended, or other sewing machine.
Instructions
1. The piece of rubber sheeting will be used as the fender cover. Since it is a non-woven fabric, you only need to straighten the edges with a rotary cutter. We used a scalloped rotary cutter.
 2. Fold the 19" x 36" piece of fabric in half (19" x 18"). Using the corner template, cut the curve along the outside edges, cutting the fold line. Pattern for Corner Template 2. Fold the 19" x 36" piece of fabric in half (19" x 18"). Using the corner template, cut the curve along the outside edges, cutting the fold line. Pattern for Corner Template
3. Measure down from the top straight edge 9-1/4" and draw a line on one side.
Upper Pocket Construction
1. Fold pleats along lines and in direction indicated on pattern piece. Select straight stitch, stitch length 2.2, and stitch along lower edge to secure pleats.
2. Turn over top edge 1/2", press, and turn over another 1/2", and press again. Stitch along lower edge to create casing.
 3. Place elastic in top casing, centering so that there is elastic extending out each side. 3. Place elastic in top casing, centering so that there is elastic extending out each side.
4. With right sides together, position pocket on bag front. Sew a 1/2" seam joining the pocket to the bag along the drawn line at lower edge.
 5. Fold pocket up and sew along edges and inside lines to form pockets, stopping at the casing edge. Backstitch several times to reinforce. Stitch elastic along one outside edge to secure. Trim. Pull other end of elastic to gather top of pockets and stitch to secure along opposite side. (Be sure there is enough expansion to put objects in pockets.) 5. Fold pocket up and sew along edges and inside lines to form pockets, stopping at the casing edge. Backstitch several times to reinforce. Stitch elastic along one outside edge to secure. Trim. Pull other end of elastic to gather top of pockets and stitch to secure along opposite side. (Be sure there is enough expansion to put objects in pockets.)
Lower Pocket Construction
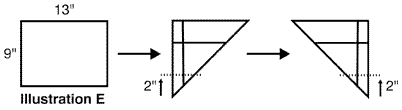
1. Fold lower 13"-edge along one side, crease and mark a sewing line 2" from the tip. Before sewing the seam, turn and press under 3/8" on 9”-sides of lower pocket. Repeat for the other side.
2. Turn under top and stitch a 1"-wide hem.
3. On bag, center and draw a 9"-long line 1" from the lower edge.
4. With right sides together, sew the lower pocket to the bag along the 9" line.
5. Fold up and stitch sides of pocket to the bag.
Bag Construction
1. Fold the bag in half, right sides together, and using a serger (4-thread safety stitch or 5-thread set-up), stitch both sides seams. Secure thread ends with fray check.
2. Turn right side out and press.
3. Turn under top edge 3/4", press, and stitch.
4. Separate the Velcro™. Sewing along both edges, stitch the hook portion to the front and the loop portion to the back.
Place the fender cover in the lower pocket, the post-cleaning tool in the narrow pocket, goggles in the center, and gloves in the side. Instructions on how to use battery cables can be placed in the cover pocket. We suggest laminating any papers.
Have fun! This is a great project for you or to make as a gift for a special someone.
Project By: Judy Bumbaugh, Elna Education Consultant
5/04
|