|
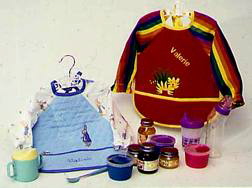 When toddlers are learning to feed themselves, they often get more ketchup on their clothes than on the French fries. In a "perfect" kitchen, we'd have a floor drain so that we could hose the kids down when they're finished eating. Lacking the "perfect" kitchen, this project will help keep the kids cleaner and there is even a pocket to catch the "big spills." These bibs are great for busy moms and make wonderful little gifts for showers, birthday, and other special events for toddlers. When toddlers are learning to feed themselves, they often get more ketchup on their clothes than on the French fries. In a "perfect" kitchen, we'd have a floor drain so that we could hose the kids down when they're finished eating. Lacking the "perfect" kitchen, this project will help keep the kids cleaner and there is even a pocket to catch the "big spills." These bibs are great for busy moms and make wonderful little gifts for showers, birthday, and other special events for toddlers.
This project is specific to a particular brand of sewing machine, notion, fabric and/or supply. However, the project may be easily adapted to other brands.
The samples shown are made with single-faced quilted flannel. The blue bib was embroidered using EnVision Card #7, Little Grey Rabbit, EnVision Card #112, Farm Designs, and personalized with the Alphabet Card #101. The sleeves and lining fabric was a purchased fabric with Beatrix Potter designs. The red bib was appliquéd using a design from a purchased children's novelty fabric. The appliqué was fused to the front of the bib using Wonder Under™ and then stitched around with appliqué stitch #26 (2.0 width, 2.0 length), and personalized with the Alphabet Card #101.
Materials
- 15" x 15" piece of terry cloth, quilted fabric, or any absorbent washable fabric
- 1/2 yard of contrasting fabric for sleeves, pocket lining, and bib lining
- 1 package (3 yards) purchased wide bias tape
- Matching thread for construction
- 1/2 yard 1/8" elastic
- Fabric marking pen
- 3 Pattern Pieces
(Note: Pattern pieces were reduced 50% to accommodate printer paper size.)
Optional Materials
- Children's fabric with designs suitable for appliqué
- Fusible web such as Wonder Under™for appliqué
- Embroidery threads for appliqué or machine-embroidered designs
- Tear-away stabilizer for appliqué or machine-embroidered designs
- Embroidery cards with children's designs
Machines and Accessories
- EnVision CE20, or other Elna embroidery or sewing machines
- Clothsetter
- 6mm hemmer foot
To Apply Bias Tape
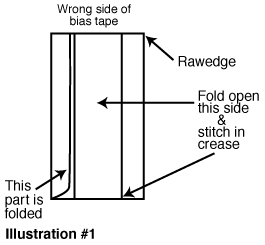 This is a two-step process that will give a very nice edge finish. Look carefully at the folds of the bias tape. You will notice that one fold is slightly smaller than the other. This is a two-step process that will give a very nice edge finish. Look carefully at the folds of the bias tape. You will notice that one fold is slightly smaller than the other.
1.Unfold the smaller edge of the bias tape. Align the edges of the right side of the tape to the wrong side of the bib. Stitch in the "ditch" formed by the crease. (See Illustration 1#)
2.Fold the bias tape over the edge to the right side of the bib and stitch close to the edge of the bias tape.
Basic Instructions to Construct Bib
Use a 1/4” seam allowance unless instructed otherwise.
1. Cut out one front, one front lining, one pocket, one pocket lining, and 2 sleeves.
2. Embellish the bib front in any manner you wish, machine embroidery or appliqué.
3. Machine baste the front lining to the bib front wrong sides together. Machine baste the pocket lining to the pocket wrong sides together. These pieces will now be treated as one.
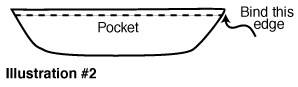
4. Bind the long top edge of the pocket following instructions to apply bias tape, above. (See Illustration #2)
5. Lay the pocket on the front of the bib with the bottom and side edges even. The wrong side of the pocket goes on the right side of the bib front. Machine baste along the sides and bottom approximately 1/8" from the raw edge.
6. Snap on the 6mm hemmer foot and sew a narrow hem at the wrist edge of each sleeve. (Or press a very narrow hem on each sleeve and stitch close to the folded edge.)
7. On the wrong side of the sleeve, place a 7"-long piece of elastic 1" in from the finished wrist edge. Select the zigzag stitch and attach the elastic following elastic application instructions below and Illustration #3.
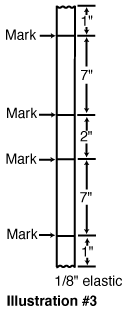 Elastic Application to Sleeves Elastic Application to Sleeves
The easiest way to handle 1/8” elastic is to mark the whole piece as follows:
- Approximately 1" from one end, make a mark with your fabric marking pen. Measure the distance you need from that mark (in this case, 7”), and mark again. Leave a 2” gap and mark again. Measure and mark off 7” again for the second sleeve.
- Do not cut just yet!
- Lay the elastic on the fabric with the first mark even with the edge of the fabric. The first inch will hang off the edge.
- Straight stitch in the middle of the elastic for 1/2" and stop. Change your stitch to a wide zigzag, 6.0, and stitch across the elastic, stretching the elastic so that the second mark is even with the other edge of the sleeve. About 1/2" from the edge, switch back to a straight stitch and finish.
- The zigzag stitch makes a casing while the straight stitches keep the elastic in place.
- Cut the elastic in the center of the 2" gap and repeat for the second sleeve. When sewing the underarm seam, you can hang onto the over-the-edge elastic to keep your seam allowance even; trim off the excess when you are finished.
8. With right sides together, sew the sleeve fronts to the bib front. Press the seam toward the sleeve. Finish seam allowance with a zigzag stitch or a 3-thread overlock stitch.
9. Sew the underarm seam of each sleeve from the wrist edge to the dot. Finish seam allowance with a zigzag stitch or a 3-thread overlock stitch.
10. Turn the sleeves right side out.
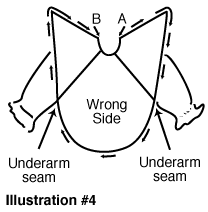
11. Stitch on the bias binding, starting at point "A" in the back, down the back of the sleeve, then around the bib front, and back to point "B”. As you approach the underarm seams, take care not to catch the sleeve in the binding. (See Illustration #4)
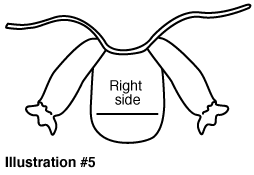
12. Mark the center front of the bib neck edge, and mark the center of a 36" piece of bias binding. Matching the center positions, pin the binding around the neck. Sew on the binding and finish the ties on each end by turning in the raw edge and stitching. (See Illustration #5)
Skill Level: Beginner
Project by Geri Frazier, Educational Consultant,
3/04
|