Materials and Supplies Needed
Fabric
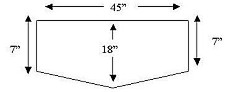
- One - 18" x 45" ivory solid for center
- Two - 2-1/4" x 45" red solid strips for border
- One - 20" x 50" red solid for backing
- One - 20" x 50" low loft cotton batting
Robison/Anton® Rayon Embroidery Threads
- #2323 - "Holly"
- #2202 - "Old Gold"
- #2266 - "Radiant Red"
- #2268 - "Carolina Red"
Miscellaneous
- Tassel
- 2-1/4 yards cording with insertion tape
- Pellon Stitch & Tear Stabilizer
- Monofilament Thread
- All-Purpose thread
- Open toe appliqué foot
- 1/4" quilting foot
- Free Motion embroidery quilting foot
- Spray Adhesive
- Free Singer The Merry Lily design download.
These embroidery instructions are specific to the QUANTUM® XL-5000 embroidery machine; however, the project can be adapted for use on other machines.
Instructions
Fabric Preparation and Set-Up
Mark the X and Y axis lines: Using a water soluble marker, draw a vertical line down the center of the ivory fabric. Measure 8" down from the top edge, and mark a line 90 degrees from the vertical center line.
Import Design and Transfer to Machine
1. Open lily design.
2. On the horizontal tool bar, select Modify.
3. Select Center Design.
4. While the design is still on the screen, print an actual size copy of the design to use for a positioning template later.
5. Print another template of the mirrored image of the design.
6. Transfer design to the smart media card or directly to machine.
 Edit Design in Machine, Embroider, and Construct Edit Design in Machine, Embroider, and Construct
1. On the machine screen, select the lily design two times to enter in a total of two designs; press the layout icon to access the edit screen.
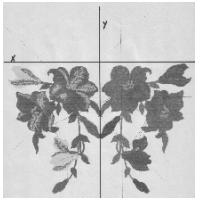
2. Select the Multi-hoop work area. Move the designs so that they appear as in the diagram at left, having the top of the designs even with the X line and the tips of the design touching at the Y line. Please note: one of the designs needs to be mirrored.
3. Hoop up the ivory fabric using the X and Y lines that are already marked for placement. Use the Pellon Stitch and Tear stabilizer to stabilize the fabric in the hoop.
4. Sew the designs.
 5. Two more of the lily patterns need to be embroidered close to the other two lilies to create one larger cluster of lilies. See the diagram at left. Use the printed templates to help in positioning the fabric in the hoop. 5. Two more of the lily patterns need to be embroidered close to the other two lilies to create one larger cluster of lilies. See the diagram at left. Use the printed templates to help in positioning the fabric in the hoop.
6. Remove the stabilizer from the embroideries.
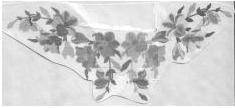
 7. Cut the ivory fabric as shown in the diagram at left, the embroidery should be centered on the fabric. 7. Cut the ivory fabric as shown in the diagram at left, the embroidery should be centered on the fabric.
8. Remove the embroidery unit, thread the machine with all-purpose thread.
9. Attach the 1/4" quilting foot.
10. With right sides together and using a 1⁄4" seam allowance, sew one of the
2-1/4" strips of red fabric to one of the bottom edges of the ivory fabric. Trim off the excess. Press the seam towards the red strip.
11. Sew the remaining 2-1/4" red strip to the other bottom edge. Trim off the excess. Press the seam towards the red strip.
12. Sew the excess strips to the sides of the ivory fabric. Trim off the excess. Press the seam towards the red strip.
13. Attach the open toe appliqué foot.
14. Thread the machine with the green embroidery thread.
15. Apply 2" strips of the Stitch and Tear to the wrong side of the fabric, centering over the seam of the ivory and the red fabrics. Spray adhesive is helpful to temporarily hold the stabilizer strips in place.
16. Select the 7th folder in the purple stitches category.
17. Select the 4th design on the bottom row. Press the "1X" icon four times to change it to say "5X".
18. Press the stitch button again to add another stitch. Select the medium size button. Press the "1X" icon four to times to change it to say "5X".
19. Press the help button (the white glove on the bottom row of buttons). Select 30.
20. Stitch the pattern on the seam line of the red and ivory fabric.
21. Remove the stabilizer.
22. Lay the batting on a flat surface. Lightly spray the batting with the spray adhesive. Lay the embroidered piece face up on top of the batting. Trim the batting to match the size of the embroidered piece.
23. Rethread the machine with the all-purpose thread. Attach the zipper foot.
24. Pin the cording to the sides and bottom edges of the embroidered piece, having the insertion tape extending slightly off the fabric.
25. Use the zipper foot to sew the cording to the fabric.
26. Sew the tassel in the seam allowance at the point of the scarf.
27. Lay the backing fabric face up on a flat surface. Lay the embroidered fabric on top of it face down. Trim the backing to match the size of the embroidered piece.
28. Pin the edges.
29. Sew the layers together using a 1/2" seam allowance, sewing close to the cording, and leaving an opening along the top edge for turning.
30. Clip corners. Turn right side out. Press.
31. Slipstitch opening closed.
32. Thread the machine with the all-purpose thread in the top of the machine, and matching thread to the backing fabric.
33. Attach the free motion foot. Lower the feed dogs. Stipple the ivory area around the embroidery.
12/04
|