1. Cut two of each pattern provided from Corduroy. 2. Cut one 5" x 18" strip and one 2" x 18" strip from Corduroy. 3. Cut one 5" x 11" piece from lining fabric. 4. Stabilize one of the bag side pieces for embroidery. 5. Mark crosshair for design using fabric-marking chalk. 6. Place fabric in hoop using the Clothsetter for perfect placement.
Embroidery
MC10000
1. Set up the MC10000 for Professional-Style embroidery. 2. Connect the Card Reader 10000 to the machine. 3. Insert Memory Card #104 into the Card Reader 10000. 4. Press the Embroidery Mode key. 5. Press the Edit tab. 6. Press the Card Reader tab. Select Design #19. 7. Press the Horizontal Flip key. 8. Press the Rotate key. Rotate 20°. 9. Press the Card Reader tab. Select Design #18. 10. Press the Horizontal Flip key. 11. Press the Rotate key. Rotate 20°. Position below Design #19. 12. Press the Card Reader tab, again. Select Design #18. 13. Press the Horizontal Flip key. 14. Press the Rotate key. Rotate 20°. Position next to previous design. 15. Press the Monogram tab. 16. Press the Font key. Select Script. Medium (M) size. Type "Gone Fishing". 17. Press the Arc key. Arc lettering below dolphin designs. 18. Press the Color key to change the thread color of the lettering. 19. Save the layout to the Built-in memory or ATA PC Card. 20. Stitch designs.
MC9000, MC5700 or MC5000
1. Set up the Memory Craft for Professional Style embroidery. 2. Insert Memory Card #104 into the machine. 3. Create a template for design #18 and #19. 4. Use the templates to position the designs on the fabric. 5. Mark the crosshair for each design. 6. Place fabric in the hoop using the Clothsetter for perfect placement. 7. Stitch each design. 8. Use Script lettering to stitch "Gone Fishing". Hint: Use Janome software to create arced lettering and print a template for placement. 9. Stitch lettering.
Construction
1. Select a Straight stitch. 2. Attach the Zipper foot "E". 3. Match up center of zipper to center of two fabric strips. 4. Sew the zipper to each of the long sides. There will be one narrow side and one wide side with the zipper in the middle. 5. Attach the Zigzag Foot A. 6. Draw a line 1-1/2" up from the straight edge on the lining fabric. 7. Make cross marks 2-3/4" in from the edge, and then 1" from that mark, 1" from that mark, 3" from that mark. These marks represent where to attach the elastic for shampoo, aftershave, and other toiletries. You may make them either closer or farther apart. 8. Sew the elastic according to marks. Be sure that the elastic loops will accommodate the selected toiletry items. 9. Sew the embroidered section, narrow section of the zipper, and lining, using a 1/2" seam allowance. Note: The embroidered section and zipper section should be right sides together. 10. Pin and turn right side out to see that you have assembled it correctly. 11. Sew the other side section to the wide section of the zipper strip. 12. Baste the bias tape to one of the short sides to form the loop carrier. 13. Sew the base to the top. Clip corners if needed to ease curves. Be sure zipper is open. 14. Clip and trim as needed. Turn right side out.
Created by Maddie Bushman, Educational Coordinator 6/04


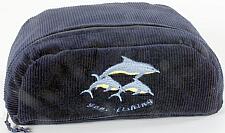 The man in your life can pack his shaving gear and other toiletries in this great looking bag. It's a useful accessory for a guy on the go!