Plastic front clock with 7" face purchased at discount store Note: You must be able to remove the plastic covering from the front of the clock.
Fabric (about 8" x 12" to fit in largest hoop). Good choices might be felt, flannel, flannel-backed vinyl, suede-like fabric
Brother iron-on stabilizer
Thread, bobbin thread
Brother ULT2003D
“That's Donald” Embroidery card from Brother Download the file to your computer
This project is specific to a particular brand of sewing machine, notion, fabric and/or supply. However, the project may be easily adapted to other brands.
Instructions
Iron Brother iron-on stabilizer to back of fabric. Hoop fabric securely in the 6" x 10" hoop.
Turn on your Brother ULT2003D. Insert the floppy disk into the disk slot on the machine. Choose EMBRIDERY EDIT. Choose the floppy disk icon. Select clock template design. Choose SET. Position the template, using the position arrows, to ^+0.00 cm, <>+0.05 cm. Choose END.
Insert That's Donald card into the card slot. Choose the embroidery card icon. Select design #4 (Donald looking at his watch). Choose SET. Position Donald at ^-2.15 cm, <>+0.80 cm. Choose END.
Insert That's Donald card into the card slot. Choose the embroidery card icon. Select design #4 (Donald looking at his watch). Choose SET. Position Donald at ^-2.15 cm, <>+0.80 cm. Choose END.
Again, choose the card icon. Select design #37 (star). Choose SET. Position the star for 9:00 at ^+0.0 cm, <>-7.25 cm. Choose END.
Repeat step 5, positioning star for 3:00 at ^+0.0, <>+7.35 and positioning star for 6:00 at ^-7.40 cm, <>+0.10 cm. Choose END. (The stars should be on the cross hairs that mark the quarters of the clock face.)
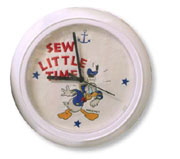
Choose the alphabet icon. Choose font #9 (2nd column, 4th from top). Choose "S". Select "M" (medium size) as your font size. Choose "E" and "W". Choose SET. Choose ROTATE. Rotate by 1 degree increments counterclockwise (left) to 352 degrees. Choose CLOSE. Position the word "SEW" to ^+4.70 cm, <>-3.65 cm. Choose END.
Use the same technique to enter the word "LITTLE" in size M font. Choose ARRAY. Choose the middle arc shape, where the letters are formed on top of the arc. Flatten the arc 3 clicks, using the flatten icon. Choose CLOSE. Choose ROTATE. Rotate the word "LITTLE" counterclockwise to 352 degrees. Choose CLOSE. Position the word "LITTLE" to ^+2.05 cm, <>-3.15 cm. Choose END.
Again, use the described technique to enter the word "TIME" in size M font. Choose ROTATE. Rotate the word "TIME" counterclockwise to 352 degrees. Choose CLOSE. Position the word "TIME" to ^+0.25 cm, <>-3.20 cm. Choose END. All of your clock should be inside of the circle.
Choose EDIT. Use the SELECT button to highlight the clock template design. Choose DELETE. (You don't want to sew the template; it is just used for positioning purposes.)
Choose END. Choose SEWING.
Embroider the clock face.
Remove the clock face from the embroidery hoop when finished.
Take the plastic cover off of the purchased clock. Be careful not tobreak off the prongs that hold it in position. You should be able to ease the hands off of the stem. Once the hands are off, the paper (usually card stock weight) can be easily removed from the clock.
Use this paper face as a template for cutting. Position it over your sewn clock face, and trace the edge, as well as the center hole. You might want to trace the clock face onto something that is more transparent if you are having trouble centering the sewn design.
Leave the iron-on stabilizer in place because it will give your clock face a little more body. Cut around the traced edge of the face, and cut out the center hole.
Use a glue stick, or spray adhesive, to secure the sewn face to the clock. Make sure that you have 12:00 at the top where the hanger is for the clock!
Replace the hands. Replace the plastic cover.
Hang your clock with pride! Be sure to design other clocks, using the template as a guide. You can place numbers at the cross hairs, or other small designs. Think of the possibilities for baby gifts, wedding gifts, kitchen, den, workroom, etc. Your ULT2003D makes it all possible!


 Materials