|
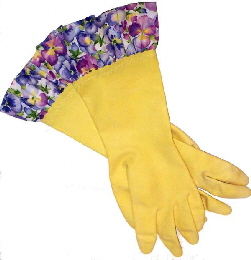 Are you a closet Bri from Desperate Housewives? Even if you’re not, your household chores don’t have to be mundane. Add a bit of glamour to latex gloves and show some style while protecting your hands. This easy project uses the serger and sewing machine and can be completed in just a few minutes! Are you a closet Bri from Desperate Housewives? Even if you’re not, your household chores don’t have to be mundane. Add a bit of glamour to latex gloves and show some style while protecting your hands. This easy project uses the serger and sewing machine and can be completed in just a few minutes!
Supplies
- Pair of latex gloves
- 1/3 yd of 44” wide fabric. This will be enough for 2 pair.
sewing.org tip - try oilcloth!
- 4 cones all-purpose serger thread
- Gathering Foot for Serger
- Thread for sewing machine needle and bobbin
- Non-stick presser foot for sewing machine (BERNINA Zigzag Foot #52)
- Sewing Machine Needles size 70/10
- Scissors
- Nifty Notions Glass Head Pins
These project instructions are specific to a Bernina sewing machine; however, the project can be adapted for use on other machines.
Cut fabric into 6” wide strips across the width of the fabric; each 6” wide strip will be enough for one pair of gloves.
Fold the wrong sides of fabric strips together – forming a strip, 3” x 44”; press.
Thread serger for a 4-thread balanced overlock stitch with the following settings:
- Tighten needle tensions to 7-8
- Set differential feed to 2
- Attach the Serger Gathering Foot to the serger
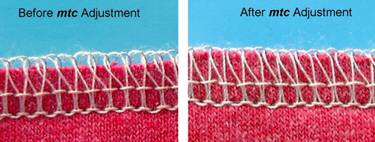
Note: If using a BERNINA serger with Micro Thread Control, set the mtc at 2 and do a test-stitch. Adjust the mtc as needed to get a flat stitch that overlocks exactly on the edge of the fabric.
Align the raw edge of the fabric strip to the edge of the serger. Serge along the raw edge, gathering it automatically in the process. After gathering the strip of fabric, set it aside.
Wind a bobbin and thread the sewing machine. Attach the non-stick presser foot to the machine.
Select a sewn-out zigzag, running stitch, or other open, side-to-side stitch. Change the width to 5.0mm and the length to 1.0mm.
Cut the gathered strip into two equal pieces. Turn the raw edges of one short end to the inside; finger press. Insert the other short end, pinning in place, forming a circle. Note: You might find it necessary to clip a few serger stitches at the top to accomplish this, just be careful not to clip too many!
Stitch together with the machine setting as above.
Divide the gathered strips into quarters and mark them with a fabric marker. Do the same to each glove.
Place the gathered strip inside the glove about ½” from the edge, place a pin at each quarter mark.
Stitch in place, aligning the right side of the presser foot to the edge of the glove. Cut threads. (stitching.jpg)
Repeat for the second glove.
By Belinda Gibson
10/06
|