1. Trace and enlarge stocking pattern 200% two times (400% total). Trace outline of stocking and toe on one rectangle of velvet.
2. Attach Walking Foot #50 to the sewing machine; attach one of the guides and set at 3/4" from the center needle position. Thread needle with Yenmet metallic thread; use matching construction thread in the bobbin.
3. Draw a single diagonal line across the velvet; stitch along the drawn line using any decorative stitch. Sew additional lines of decorative stitches 3/4" apart, aligning the quilting guide with previous lines of stitching. Do not stitch within the marked toe area.
4. Mark and sew a second set of diagonal lines, creating an overall diamond pattern on the velvet. Stitch along the marked toe outline.
5. Cut stocking front from embellished velvet. Cut stocking back from plain velvet rectangle. Place front and back right sides together. Using Walking Foot #50 and construction thread in the needle and bobbin, stitch all sides of the stocking, leaving top open.
6. Place lining pieces right sides together; seam together, leaving top and a 4" space along one side open.
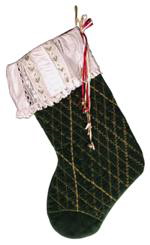
Heirloom Cuff
1. Using your favorite heirloom sewing techniques, create a 6" x 24" rectangle. Sew ends together to form a tube. The sample uses the following techniques: (1) pintucks; (2) lace-to-fabric; (3) lace-to-lace; (4) puffing. For specific instructions, see Heirloom Beginnings and/or Feet-ures, published by BERNINA®.
2. Trim strip of heirloom fabric to 5" wide, as indicated by red lines. Gather lace edging and attach to lower edge of strip.
Construction
1. Sew a line of gathering stitches along the top edge of the heirloom cuff. With wrong side of cuff to right side of velvet stocking, pull gathers to fit cuff; pin to top edge of stocking matching raw edges. Turn lining wrong side out; place stocking and cuff inside lining. Pin, matching raw edges and seams. Stitch. Turn stocking right side out through opening in lining.
2. Create bow and loops from ribbons and add charms; tack to upper back edge of stocking.