|
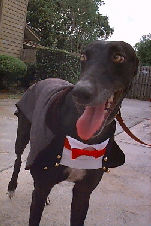 Our hound tuxedo is very popular. The design is flattering to the build of a greyhound, but can be used for other dogs as well. The tux stays put quite well, even on fidgety dogs. It’s easy to put on and take off when made with the fastener described here. And doesn’t it make for a dapper looking hound! Perfect for weddings and formal events. Our hound tuxedo is very popular. The design is flattering to the build of a greyhound, but can be used for other dogs as well. The tux stays put quite well, even on fidgety dogs. It’s easy to put on and take off when made with the fastener described here. And doesn’t it make for a dapper looking hound! Perfect for weddings and formal events.
Use any dark fabric, but black or charcoal gray summer-weight wool produces the best results. This kind of fabric hangs very well.
Throughout these instructions, we refer to the inner fabric and the outer fabric. We find it easiest to use just one fabric for both the inner shell and the outer. However, when low on a particularly good outer fabric, we will use a different fabric for the inner shell.
Time Needed
Each tux takes about 1-1/2 hours to make, or slightly longer if this is your first coat.
Materials Needed
- 5" strip of 2"-wide sew-on hook-and-loop-tape (or 10" strip of 1"-wide)
- 1 yard of outer fabric (44" or 54" wide)
- 1 yard of inner fabric (44" or 54" wide)
- One 10" x 30" piece of white fabric for shirt
- One 36" x 8" piece of black velvet or black satin for the collar of the tux
- 1/4 yard of satin for cummerbund and tie
- 6 gold or pearl buttons for front of coat
- 2 gold buttons and a 4"-length of gold chain for tail buttons
- Large sheet of paper or a paper bag cut open for pattern
- Download the Diagrams
Optional
- One 12" x 18" piece of white fabric for French cuffs
- One 2" length of 1"-wide sew-on hook-and-loop-tape for French cuffs
- One felt top hat (find this in the doll section of your craft store)
- One sheet of black plastic canvas to make top hat sturdy
- One 8" length of black 1/4" elastic for hat strap
Measure Hound
- Length – From where the neck bends and becomes the back to where the tail starts
- Girth – Biggest distance around the chest, just behind the front legs
- Width – Distance across chest as you look straight on at the hound
Make Pattern Pieces
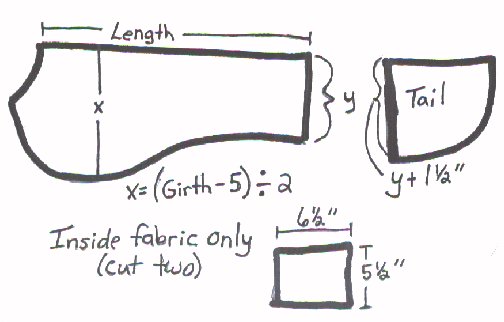 1. On a large sheet of paper, draw out the main pattern piece similar to the one above, using the measurements you took on your hound. Generally, you want the coat full around the chest and to taper as it moves toward the rear. The rear should end just where the tail starts and must be squared off to accept the "tails" of the tuxedo. 1. On a large sheet of paper, draw out the main pattern piece similar to the one above, using the measurements you took on your hound. Generally, you want the coat full around the chest and to taper as it moves toward the rear. The rear should end just where the tail starts and must be squared off to accept the "tails" of the tuxedo.
2. To figure out the X measurement in the drawing above, subtract 5 inches from your hound's girth, then divide the result by 2.
3. Now take the pattern to your hound. This is a tough job, but worth the effort. Hold the pattern in place along the hound's spine and make sure the coat falls as you would like. Make sure the coat will cover the chest but not be too big. If you need to make changes, do it now. Once you get a perfect pattern for your hound, you'll never have to go through this again.
4. Make pattern for the “tail” of the tux. (This is the flap that hangs over the butt.) For this, you'll need to measure the width of your first pattern piece at the rear end. Add 1-1/2" to this measurement and draw a line that length on pattern paper. Draw a line at a right angle to this and make it 8" long. Now draw a curved line to connect the two endpoints. You should have a pie-shaped piece.
Cut Inner Fabric
1. Fold the inner fabric in half. Place the long straight side of the main pattern piece along the fold and pin. THIS IS IMPORTANT: Allow 1/4" - 1/2" extra around the pattern for the seam allowance as you cut the fabric.
2. Place the tail pattern piece along the fold and cut out, allowing for your seam allowance. Then cut along the fold so you have two sections that are mirror images of each other.
3. Finally, cut two 6-1/2" x 5-1/2" rectangles.
Cut Outer Fabric
1. Fold the outer fabric in half, using the folded inner fabric as the pattern. This will assure you that the inner and outer fabrics will match perfectly. Cut the outer fabric to match the inner fabric shape.
2. Lay one of the inner fabric tail pieces on the fold of the outer fabric. Repeat as with the inner fabric in Step 2 above, cutting the outer fabric tail pieces to match.
3. Note: No rectangles of the outer fabric needed.
Construct the Shirt and Tie
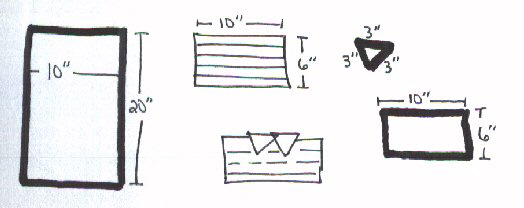 1. Cut a rectangle of white fabric 10" x 20". Fold the fabric into pleats and iron them one by one. After folding and ironing the pleats, you should end up with a piece that is 10" x 6". 1. Cut a rectangle of white fabric 10" x 20". Fold the fabric into pleats and iron them one by one. After folding and ironing the pleats, you should end up with a piece that is 10" x 6".
2. Cut one 10" x 6" rectangle of the white fabric as a backing.
3. Cut four triangles for the shirt collar. These should be about 3" along each side. Place two triangles right sides together and stitch along two sides. Repeat for the other pair of triangles. Trim point, turn triangles right side out, and iron.
4. Place the pleated piece of fabric right side up on your work surface. Place the two triangles side by side along the top edge of the pleated fabric, aligning raw edges and placing in the middle as shown in drawing above. Then place the 10" x 6" rectangle on top of this, right side down, and pin.
5. First, carefully sew along the two short ends. Then sew along the top edge; this will stitch the triangles into place. Then sew the bottom edge, leaving a 2” opening for turning. Turn the shirt right side out and press so that the triangles form the collar. Hand-stitch the opening closed.
6. Cut a 2-1/2" x 24" rectangle of satin for the tie. Fold the rectangle lengthwise, right sides together. Stitch the length of the satin to form a tube, and turn right side out. Tie into a bow of the appropriate size for the shirt. Using thread that matches the satin, stitch the long ends of the tied bow under the triangles that form the collar. Trim the excess ends of the satin tube. The front of the shirt is now complete.
Construct Cummerbund (Stomach Straps)
 1. Fold one of the 5-1/2" x 6-1/2" rectangles of inner fabric in half right sides together, so you have a 5-1/2" x 3-1/4" rectangle. Stitch the two short sides using a 1/4" seam allowance and turn right side out. Sew the scratchy side of the hook-and-loop tape to this rectangle, placing it as close to the folded edge as possible. 1. Fold one of the 5-1/2" x 6-1/2" rectangles of inner fabric in half right sides together, so you have a 5-1/2" x 3-1/4" rectangle. Stitch the two short sides using a 1/4" seam allowance and turn right side out. Sew the scratchy side of the hook-and-loop tape to this rectangle, placing it as close to the folded edge as possible.
2. Sew the soft side of the hook-and-loop tape to the second 5-1/2" x 6-1/2" rectangle of inner fabric, placing it about 1/2" from the edge and along the short side of the rectangle. (The finished stomach strap will be 6" x 5”.)
3. Cut a rectangle of the satin 6-1/2" x 15" and iron it flat. Loosely baste along each of the longer edges. Pull the threads to scrunch the fabric so that it’s a 6-1/2" x 5-1/2" rectangle. With right sides together, pin the inner fabric rectangle to the scrunched satin rectangle (the hook-and-loop tape will be sandwiched in between the two layers until the unit is turned right side out). Stitch the two scrunched edges first. Then stitch along the other two edges, making sure not to catch the folds of satin in the seam, and leaving a 2" opening unstitched along one of the edges. Turn the assembly right side out and hand-stitch the opening closed.
Stitch the Tail Pieces
1. Place one inner fabric tuxedo tail and one outer fabric tuxedo tail with right sides together. Stitch along the 8"-side and the curved side, leaving the third side open. Place the remaining inner fabric tuxedo tail and outer fabric tuxedo tail right sides together; the curved side of this tuxedo tail should be on the opposite side from the first one you did. Stitch the 8"-side and the curved side, leaving the third side open.
2. Clip the corners and curves to promote a smooth seam. Turn both units right side out and iron flat.
Cut and Construct the Collar
 This part will scare you, but it always works out great if you just follow these steps. Really. This part will scare you, but it always works out great if you just follow these steps. Really.
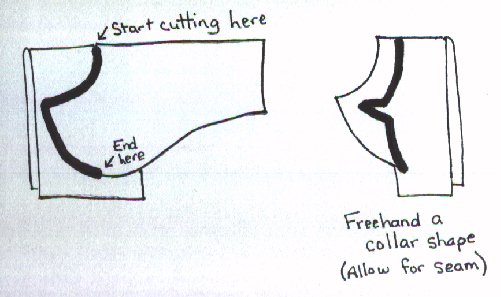
1. Fold the collar fabric (velvet or satin) in half with right sides together. Lay this under the inner fabric coat piece with the folds together. Cut the collar to precisely match the neckline, following the line of the inner fabric neckline through the curve of the coat to about where the front legs will be.
2. Remove the inner fabric. Freehand a collar shape as you'd like it to lay on the coat; be sure to add 1/2" for a seam allowance. See above diagram for the collar shape.
Take the piece you just cut (with right sides together) and flip it so the wrong sides are together. Use this as the pattern to cut the back side of the collar. (You'll be cutting it out of the fabric with right sides still together; only the pattern will be wrong sides together.) Cut it to match the first collar piece.
4. Unfold the collar pieces and place them right sides together. Stitch along your freehand edges, leaving the neckline edge open. Clip curves and corners and turn right side out.
Final Assembly
 1. Lay the inner fabric with right side facing up. Place the tuxedo tail pieces on this. The raw edges of the tuxedo tail units should be aligned with tail edge of the coat. The two tuxedo tail pieces should overlap in the center by a few inches, and they should be placed 3/8" from the outer edges of the sides of the coat. (This will allow them to flip out correctly when you turn the whole thing right side out.) 1. Lay the inner fabric with right side facing up. Place the tuxedo tail pieces on this. The raw edges of the tuxedo tail units should be aligned with tail edge of the coat. The two tuxedo tail pieces should overlap in the center by a few inches, and they should be placed 3/8" from the outer edges of the sides of the coat. (This will allow them to flip out correctly when you turn the whole thing right side out.)
2. Lay the stomach straps (cummerbund) in place: Lay the satin piece with the satin facing up. Lay the other strap with the hook-and-loop tape facing up. Both should be placed on the sides where the coat starts to curve along the chest, and so that they will not interfere with the front legs when the tux is on and the cummerbund fastened.
3. This order is important: Place the shirt front with the TIE FACING UP as shown in the diagram. Then place the collar assembly in place, over the shirt front.
4. Place the outer fabric in place, right side down. Pin all the parts in place.
5. Starting at the left side of the neckline, sew the pieces together. Leave a 5" opening near the collar. This will allow you to turn the coat right side out and make the final chest strap adjustments. Start sewing at the dot indicated on the diagram: this will be 1/2" from the collar corner on the side of the coat that DOES NOT have the shirt front pinned in place. Sew around almost the entire coat, sewing over the tuxedo tails and stomach straps, keeping them in place. Stop when you get to the second dot noted on the diagram (this will be 4” to 5" from the point where you started sewing).
Turn Right Side Out and Press
1. Clip all curves and trim corners, and turn the coat right side out. Press the seam all around the coat, including the opening in the coat, which will make the next step easier.
“Test Drive” the Coat and Mark Chest Strap:
Don't skip this step
1. Take the coat to your hound and try it on. Make sure the stomach straps are an appropriate length to fit snuggly but not too tightly. Check the length of the coat. (You can make the coat shorter, but not longer at this point.)
2. Pull the shirt front across the hound's chest and mark where the seam should be for a perfect fit. Don't worry if the chest strap is a few inches too long. You can trim it to a proper length before the final sewing.
3. If you need to adjust anything, turn the coat wrong side out, pull out the necessary stitches, and do it now. You'll thank yourself later.
Connect Shirt Front
1. Poke the dangling end of the shirt front into the coat body to the point you marked earlier. Use two pins to hold it in place. Make sure the seams are folded neatly on both sides and that they match (so that the top stitching will catch all pieces of fabric, including both layers of the collar). Using a thread that coordinates with the collar, either hand stitch or machine stitch to top stitch edges.
Add Final Touches
1. Thread a gold button on one end of the gold chain, and hand-sew this to the tuxedo tails, just where they cross over each other. Thread the other gold button on the other end of the chain. Hand-sew this in place to the other side of the tuxedo tail overlap. Be sure to leave a little slack so you get a graceful curve in the chain when it hangs.
2. Hand-sew the six pearl or gold buttons to the collar of the coat, just next to the shirt front.
That's it. You're done. Now take that fashionable hound for a walk. You both deserve it!
Optional
Make French Cuffs
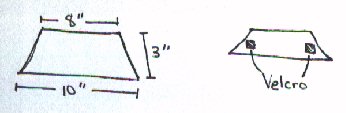 1. Fold the white fabric with right sides together and cut a trapezoid shape as shown in the diagram. Stitch almost all the way around, leaving a 2" opening. Turn right-side out and iron. Top-stitch 1/4” away from the edge all the way around the piece. Cut a 1" x 1" piece of hook-and-loop tape, and sew the two sides of it to the same side of the trapezoid piece. Repeat these steps for the other cuff. 1. Fold the white fabric with right sides together and cut a trapezoid shape as shown in the diagram. Stitch almost all the way around, leaving a 2" opening. Turn right-side out and iron. Top-stitch 1/4” away from the edge all the way around the piece. Cut a 1" x 1" piece of hook-and-loop tape, and sew the two sides of it to the same side of the trapezoid piece. Repeat these steps for the other cuff.
Strengthen and Add Strap to Top Hat
1. The felt top hats available in the doll department of most craft store are pretty flimsy. To strengthen a felt doll hat: Measure the height of the inside of the top hat. Cut a piece of plastic canvas in a rectangle that is a little less than that height. The width of the rectangle should be exactly the circumference of the hat (i.e., distance around the hat). Using a hot glue gun, glue one end of the 8"-elastic strap to the inside of the hat. Then glue the other end of the strap into place. Finally, glue the plastic canvas rectangle into the inside of the hat. Be sure to leave the smooth factory edge of the plastic canvas toward the hound's head.
Project courtesy of Jack and Amy Corrigan
12/04
|


