Supplies
- Serger (Baby Lock Éclipse)
- 3/8 yd. satin
- 2/3 yd. of 1” flat lace edging
- 2/3 yd. of 2-1/2 – 3” flat lace edging
- 4 – Cones of all purpose thread
- 1 – Spool of Sulky™ Rayon Thread (coordinate with fabric)
- 1 – Rotary cutter, mat, and ruler
Cutting Instructions
From satin, cut one of each piece:
- Piece #15-1/2” x 8” Bow
- Piece #21-1/2” x 6” Bow
- Piece #312” x 13” Tote
- Piece #4 8” x 11” Tote
- Piece #511” x 21” Tote Lining
- Cut 1” flat lace edging in half for 2 –12” strip
This project is specific to a particular brand of sewing machine, notion, fabric and/or supply. However, the project may be easily adapted to other brands.
Serger Settings
These settings are for a Baby Lock Éclipse, but these are pretty much the same for most sergers
|
Narrow Rolled Hem
Stitch:Right Needle Thread
Stitch Length:2-1/2
Stitch Width:3.0
Differential Feed:N
Tension:Tighten Lower Looper to 6-7
|
Four Thread Seam
Stitch:Four Thread
Stitch Length:3
Stitch Width:M
Differential Feed:N
Tension:Balanced
|
|
Four Thread/Gathering
Stitch:Four Thread Gathering
Stitch Length:4
Stitch Width:M
Differential Feed:2
Tension:Balanced
|
|
Bow Construction
1. Set the serger to a narrow three thread stitch. On piece #1, serge across both short ends. With right sides together, fold the serged ends to the center, overlapping 1/2”. Serge-seam the open ends together. Turn right side out and press
2. On piece #2 serge-finish all four edges. Press the long edges to the center forming one long strip. Starting at a folded edge of bow piece #1, finger gather down the center. Place topside down on center of strip. Ties the strip around the gathered piece to form a bow. Set aside.
Lingerie Tote Construction
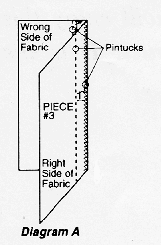
1. Set the serger to a narrow rolled hem. Change the upper looper thread to Sulky Rayon. To prevent cutting the fabric, lock the blade. On piece #3 fold wrong sides together so the piece measures 6” x 13”. Sew over the center fold to form a pintuck. Fold and sew another pintuck 1” from the center pintuck on each side. Press tucks to one side (diagram A).
2. Measure 2” from the right and left pin tuck.
With Serger- Fold fabric lengthwise with wrong sides together and press. Lay the straight edge of the 1” lace edging on the fold, with scallop edge toward the raw fabric edge. Keeping lace even with the fold, sew lace to the fold using the narrow rolled hem stitch.
With regular sewing machine –A tucked or pintucked presser foot is available for most sewing machines to create Pin tucks. If no foot is available, for your machine fold the fabric, press over and stitch a line ¼ inch wide by using the outer edge of your presser foot as a guide along the edge of your fabric open press to the side and then repeat till you have proper number of tuck lines.
3. Set the serger for four-thread gathering. Change the upper looper thread to all-purpose sewing thread. Gather the wide piece of lace edging. Set aside.
Regular sewing machine gathers can be made by stitching a baste stitch along one side and tying off the long threads at one end and then pulling the lower thread.
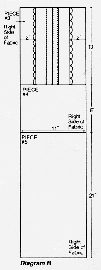
4. Unlock the blade. Set the stitch length to 3, and the differential feed to “N”. Place the 11” edges of #3 and #4 right sides together. Serge a 1/4” seam allowance. Press the seam to one side. Match the remaining 11” edge of piece #4 to the 11” edge of piece #5 with right sides together. Serge a 1/4” seam and press to one side (diagram BN).
Regular machine Place the 11” edges of #3 and #4 right sides together. Stitch a 1/4” seam allowance. Press the seam to one side.
Match the remaining 11” edge of piece #4 to the 11” edge of piece #5 with right sides together. Stitch a 1/4” seam and press to one side (diagram BN).
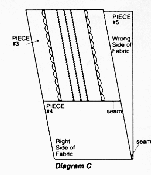
5. Fold the joined sections in half, wrong sides together at the seam line joining pieces #4 and #5 (diagram C).
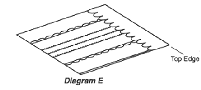
6. With decorative stitch side facing up, fold bottom of bag at seam line (diagram D).
7. Sew side seams making sure to catch all layers. Turn bag right side out and press. Press under the serged sides of the top flap.
8. Match gathered edge of lace at top raw edges of bag, right sides together. Change the stitch width to 7.5 and serge the lace to the top edge Regular machine simple place stitch setting to 2.5 and stitch lace to top edge using a ¼” seam. Press flat.
9. Place bow on the center front pintuck, hand tack in place.
Helpful Hints
- When sewing pintucks, attached the blind hem foot to the machine. The guide on the foot is adjustable and is perfect for guiding pintucks.
- When sewing pintucks, lift the front of the presser foot and slide the fold under the foot approximately 1/2”.
- Hold the serger chain as you begin sewing so that it does not get caught in the pintuck.
- Lock the cutting blade to prevent cutting into the fabric.
- The cutting blade on the Éclipse is fully adjustable. To achieve a delicate pintuck, set the stitch width at 3.0.
by Faye Graham
|