|
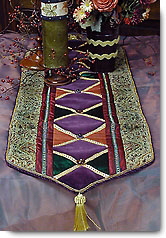 Want to make something a little different for the Holidays, something reminiscent of the luxury and glamour from the medieval times? Get some velvets and soft velour fabrics at your local fabric store - search through the remnants of upholstery fabrics for the best finds - and a few trimmings, then start your own unique table runner. Want to make something a little different for the Holidays, something reminiscent of the luxury and glamour from the medieval times? Get some velvets and soft velour fabrics at your local fabric store - search through the remnants of upholstery fabrics for the best finds - and a few trimmings, then start your own unique table runner.
Made using triangles and diamonds, it's so easy to do if you just use a few basic quilting techniques.
Materials
- 3 1/2 yds. Wrights® 1/4" Gold/Gold Metallic trim
- 2 1/4 yds. Wrights® 1/4" Green/Gold Metallic trim
- 2 2/3 yds. Wrights® Purple Chenille Cording (#144-8902-539)
- 2 2/3 yds. Wrights® Green/Gold Metallic “parachute style” Cord
- 2 Wrights® Gold Tassels (#144-9071-046)
- 1 - 40" x 6" Purple Velvet Fabric
- 2 - 40" x 14" Purple Velvet Fabric
- 2 - 40" x 2 1/2" Burgundy Taffeta Fabric
- 2 - 40" x 3 1/2" Woven Tapestry
- 1 - 9" x 18 Copper Silk Fabric
- 1 - 9" x 18 Green Satin Fabric
- 1 - 7 3/4" - 1" buttons (of choice)
- 1 - 40" x 14" Lo-Loft Batting
- Pellon™ Wonder Under®
- Beacon™ Fabri-Tac™ Adhesive
- General Supplies: Scissors, Thread, Tape Measure, Sewing Machine, Pins, Pencil or Fabric Marker.
- Pattern
Instructions
1. Apply Pellon™ Wonder Under® to the wrong side of the Copper Silk and Green Satin fabric as directed by the manufacturer. Measure and mark six triangles (5" x 4" x 4", with the 5" side on the straight of the grain) on the Copper Silk. Measure and mark eight matching triangles on the Green Satin in the same manner. Cut triangles.
2 . With right sides facing up, center two Copper triangles on the 6" Purple Velvet strip (center front), having points face one another and straight edges aligned. Fuse in place according to the manufacturer's directions. Place one green triangle 1/2" away from each of the Copper triangles, aligning them in the same manner. Fuse in place as before. Continue in this manner, alternating colors, and fuse the remaining triangles.
3 .Measure and cut the Gold/Gold Metallic trim into fourteen 9" pieces. Glue (or stitch) pieces over the edges of the triangles forming "X's".
4. With right sides facing up, baste the Purple Velvet strip to the center of the batting. With right sides facing, stitch one Burgundy Taffeta strip to the left edge of the center front, using 1/2" seam. Finger press the Taffeta toward the batting and baste the edge in place. Repeat this process, adding the remaining strip to the right side.
5. Stitch the Tapestry to the runner front - see step 4.
6. Center and glue the Green/Gold Metallic trim to the Burgundy Taffeta, cutting to fit.
7. Trim ends of runner as desired - suggestions are a shaped bracket (see photo), a "V" or a tapered curve.
8. Baste a tassel to the center front of each end.
9. Using a cording/zipper foot, baste the cording in place along the edge of the runner front, butting ends.
10. With right sides facing, pin the runner front to the backing. Stitch a 1/2" seam allowance around the edge, leaving an 8" - 10" opening along one side for turning. Trim and clip the seam. Turn right side out. Sew opening closed.
11. With right side facing up, glue Parachute Cord along the edge of the Chenille Cording, tucking ends under.
12. Stitch buttons in place at the "X" intersections.
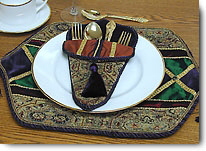 The Finishing Touch The Finishing Touch
You can easily create matching utensil holders and glamourous place settings to be an heirloom piece for future holidays! Just use the smaller pieces of luxurious fabrics. The metallic cords, bands and tassel are the perfect tie in.
12/06
|


