|
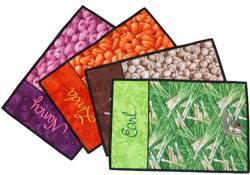 These unique placemats feature “food fabrics” and are embellished with names—make one for every member of the family! These unique placemats feature “food fabrics” and are embellished with names—make one for every member of the family!
Yardage Needed
To make 4 placemats you need four different “A” fabrics and four different “B” fabrics. The same “C” fabric is used for all four placemats. Samples were made using RJR Fabrics: Kyles Marketplace and Handsprays.
Important Note: These project instructions are specific to a Bernina machine; however, the project can be adapted for use on other machines.
For Four Placemats
- Fabric A—¼ yard each (need 4 – total of 1 yard) solid or tone-on-tone
- Fabric B—½ yard each (need 4 – total of 2 yards) veggie prints
- Fabric C—about ½ yard each (2 yards total) of contrasting (black is shown) fabric for piping, binding and backing
- Batting—1 Craft size package of Warm & Natural® batting (34” x 45”)
- Cording—18” each of 1 or 2 mm (2 yards total); preshink before using
Note from Nancy
By changing the veggie print you can make holiday or seasonal placemats. You could also use “orphan” blocks that you have in your UFO collection. For example, strip piece a log cabin square from leftover fabrics... let your imagination help you get creative in personalizing your placemat project.
 Other Supplies Other Supplies
- Brytes thread by Superior Threads
- Calligraphy with Thread by Nancy Kazlauckas
- Piping Foot (BERNINA Foot: Bulky Overlock Foot #12/12C)
- Your favorite free-motion quilting foot such as Quilting Foot #29/29C
- BERNINA Stitch Regulator
For Each Placemat Cut
- Fabric A: solid or tone-on-tone 14” x 6”
- Fabric B: veggie print 14” x 15½” and 10½” x 7½” for pocket
- Fabric C: contrast for cording, binding and backing
- Piping: 1 strip - 2½” x 18”
- Binding: 2 strips - 2½” x width of fabric
- Backing: 16” x 22”
- Batting: 16” x 22”
Name Game
Letter the name on the 14” x 6” Fabric A piece using the method that appeals to you:
1) Follow step-by-step directions in the book Calligraphy with Thread by Nancy Kazlauckas to stitch the names using the free-motion thread calligraphy technique as shown on the samples.
2) Applique the names using print fabric from each placemat.
3) Machine embroider name(s) using embroidery software.
Construction
1) Make cording using a piping foot (BERNINA Foot: Bulky Overlock Foot #12/12C). Place cording in center of fabric strip and adjust the needle position to sew next to the cord. With name border right side up, place cording strip on right side of name border strip and stitch on same line of stitching cording.
2) Place the veggie print and the cording/name border right sides together. Stitch with the cording/name border strip up, and stitch 1 thread to the left of previous stitching (move needle position). Press cording toward the veggie print.
3) Layer the pieces together. Place backing wrong side up, batting on top, and placemat on top of batting; pin. Square up the placemat if needed. Attach your favorite free-motion presser foot to the machine. Lower the feed dog and quilt as desired. Note: Mininum quilting should be stitch-in-the-ditch between the name border and veggie print, outline stitching around each letter of the name and some quilting in the center of the veggie print (follow the veggie print, stitch the same veggie print in a free motion design or simply do some cross-hatching).
4) Fold the 10½” x 7½” piece in half so it is 5¼” x 7½”, press. Fold in half again with the first folded edge toward the top. This is the silverware pocket.
5) Join binding strips, fold in half wrong sides together, press and attach binding strips using your preferred method.
Repeat same procedure for each placemat. Make as many as you want for your family and friends.
It is easy to make the placemats in an assembly line fashion – this seems to go faster than making one at a time.
By Nancy Kazlaucka
8/06
|


