 Supplies Supplies
- 3/8 yd. (.4m) of Taupe and Blue Striped Fabric
- 1/4 yd. (.2m) of Red and Black Checked Fabric
- 1/8 yd. (.2m) of Green and Black Checked Fabric
- 1/8 yd. (.2m) of Blue and Black Checked Fabric
- Raffia
- Orange Fabric Marker OR Paint
- Three 3/4" (2cm) Buttons, One Red, One Blue and One Green
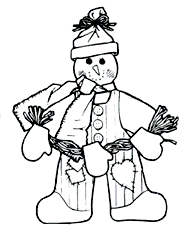
- Body, Pants, Heart, Snowman Mitten, Snowman
- Face Guide and Hat Patterns
- Printable Pattern (Increase pattern by 400% on a copier)
Cutting Instructions
Using body pattern, cut two muslin sections and one batting section.
Using pants pattern, cut one section from the taupe and blue striped fabric.
Using the hat pattern, cut one section from red and black checked fabric; also using mitten and heart patterns, cut one section of each from the red and black checked fabric.
Using the mitten pattern, cut one section each of green and black checked fabric and blue and black checked fabric. From the green fabric, cut one 3" x 22" (7.5cm x 56cm) section for the scarf and cut one 1" x 1" (3.2cm x 3.2cm) section for a patch. From the blue and black checked fabric, cut one 1" x 1" (3.2 cm) section for a patch.
Using the patterns, cut one pants and one heart from fusible webbing. Also cut two 1" x 1" (3.2cm x 3.2cm) patch sections from fusible webbing. Fuse these sections to the wrong sides of the matching fabric sections, following manufacturer's instructions.
 Body Body
1. Sandwich the batting body section between the wrong sides of the body front and body back muslin section. Stitch 1/8" (3mm) from the outer edges of the body, making sure to catch all the layers in the stitching.
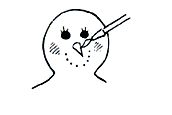
2. Using the face guide, center the guide over the head of one body section. For the snowman face, draw the eyes and mouth with black, also outline the nose with black. Fill in the nose with orange. Allow the colors to dry thoroughly. Blush the cheeks.
3. Fuse Overalls to the body. Follow manufacturers instructions for fusing.
 4. Tie a knot in the ends of the 4" (10cm) piece of 1/8" (3mm) ribbon to create a loop. Stitch or glue the ribbon loop to the head back to create a hanger. 4. Tie a knot in the ends of the 4" (10cm) piece of 1/8" (3mm) ribbon to create a loop. Stitch or glue the ribbon loop to the head back to create a hanger.
5. Position the patches and the heart. Fuse them in place. Using the black fabric marker, draw short "stitches" around the patches and the heart.
6. Arrange the buttons on the front of the pants. Glue the buttons in place.
7. Remove threads from the outer edges of the scarf section so that you will have 1/4" (6mm) of "fringe" all around the scarf. Tie the scarf around the neck and glue the edges in place as desired.
8. With right sides together, pin the hat sections together. STITCH the side and upper edges together, leaving the bottom, straight edge open.
9. Clip the curves and turn the hat right side out. Press. Fold 2" (5cm) along the lower edge of the hat to the inside. Press. Fold a 1" (2.5cm) cuff to the outside along the lower edge of the hat. Place the hat on the head and glue it in place. Using raffia, tie a small bow around the top of the hat.
10. Using several strands of raffia, cut a 15" (38cm) long garland. Tie a knot 2" (5cm) from each end of the garland and tie a knot in the middle of the garland. Glue the end knots to the hands. Glue a mitten to each knot.
12/03
|

