Free Sewing & Craft Projects, Learn to Sew, Guidelines Articles, Charitable Projects, Bridal, Kids & More

sewing and craft projects at www.sewing.orgsewing and craft projects at www.sewing.org


Find a Sewing Teacher
Guidelines for Sewing
line_menu


Baby & Toddler
Bridal Sewing
Charitable Sewing
Dolls, Toys, Games
Fashion Sewing
Fun Projects
Home Decor
Jewelry
Kids Projects
Men's Sewing
Pets
Pillow Projects
Purses, Bags, Totes
Quilt Projects
Teen Projects


Christmas & Winter
Halloween
Thanksgiving
Other Holidays
line_menu


My Sewing/Craft Room
SEW-lutions Blog
line_menu


Advertise With Us
Contact Us
Newsletter Sign-Up
line_menu


Body Form Booklet
Sewing Gifts


spools_thread

Sewing & Craft Alliance


Sewing & Craft Alliance


sewing.org
nationalsewingmonth.org
trainedsewinginstructor.com
sewtrendy.com
 

Fun Sewing & Craft Projects

Project provided courtesy of:
Simplicity Pattern Co.  ©

Wall Organizer

Supplies

  • 36” x 28¼” (91.5 x 71.5 cm) rectangle of canvas
  • 18” x 12” (45.5 x 430.5 cm) medium weight clear plastic
  • 2 3/8” yards *217 cm) ¾” (2cm wide striped grosgrain ribbon
  • Size 16 sewing machine needle
  • Pinking shears

Here’s how

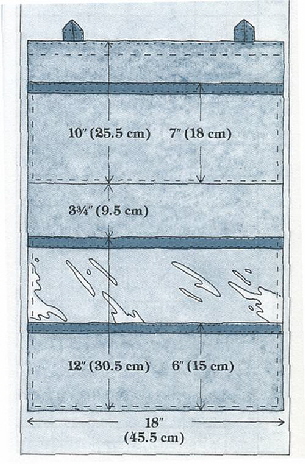
1. Cut: Cut an 18” x 28¼” (45.5 x 71.5 cm) backing piece from canvas. Also, cut one 18” x 7¾” (45.5 x 19.5 cm) pocket and one 18” x 6 3/8” (45.5 x 17 cm) pocket from canvas. Cut three 18” (45.5 cm) and two 1” (38 cm) ribbon lengths.


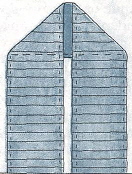
2. Loops: Fold the short ribbon pieces in half to form a double layer. Edgestitch. Make loops as shown in Sketch 1, stitching across bottom triangle.

3. Prepare Backing: pink top and bottom edges; turn 1¼” (3.2 cm) and press. Pin loops in position at top. See Sketch 2. Edgestitch along both folded edges. Topstitch ¾“ (2 cm) from finished edges.

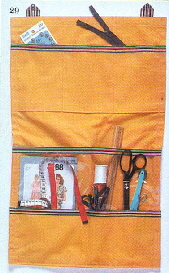
4. Pockets: Press upper raw edge of canvas pockets ¼” (6 mm) towards right side. Pin ribbon along pressed canvas edges and flush with plastic top edge. Edgestitch both long sides of ribbon. Press under ½” (1.3 cm) at lower canvas pocket edges. Pin and stitch pockets to backing, layering lower canvas pocket over plastic as shown in Sketch 2.

5. Finish: pink side edges. Turn under 1” (2.5 cm) Press. Pin and topstitch 5/8” (1.5 cm) from finished edges. Divide pockets into sections as desired by stitching vertically through all layers.

Simplicity’s 76 Great Gifts Book
Project #29

Back to Fun Projects
 

www.sewing.org
Privacy PolicyCopyright, Reprint, Linking