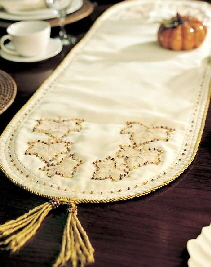
Whispers of Autumn will welcome friends and family to the coziness of a home-cooked meal. Using multi-media to create this stunning piece of embroidery will delight any host or guest. With autumn approaching, it is time to draw the family and friends closer. Setting an inviting table with this table runner will surely set the mood for a festive meal. Create this multi-media table runner and learn some new ways to embroider.
Important Note: These project instructions are specific to the Janome Memory Craft 10000 machine; however, the project can be adapted for use on other machines.
Janome Supplies Required:
Memory Craft 10000
Digitizer 10000
USB or RS232C cable, or ATA PC Card
Clothsetter 10000
Memory Craft 8000 Embroidery Design Gallery CD ROM
Large Hoop B
Embroidery Foot P
Zig-zag Foot A
Even Feed Foot (embroidery machines)
Beading Foot Set
Blue Tip needle 75/11
Inside Information:
The techniques used in creating this table runner are slightly advanced. The leaf design is transferred to the MC10000 and resized to decrease the stitch density of the design. If the design were resized in Digitizer 10000, the stitches would be regenerated not producing the finished effect. The embroidered piece is turned upside down for a shadow effect when the table runner is constructed. The designs are also embellished with beads that are attached by machine. We strongly suggest you practice this technique due to its advanced nature. To embroider on the chiffon and organza, there is a new stabilizer on the market that is adhesive water soluble that will make these fabrics easier to embroider. You can fuse the fabrics together to form one layer of fabric.
Fabric and Notions Required:
Makes one 45" long table runner
1/2 yd. ivory chiffon fabric (starched three times)
1/3 yd. gold sparkle organza
1/2 yd. ivory satin
1/2 yd. fall print
4 yds. decorative cord
18" x 45" iron on batting
Water soluble stabilizer
Fall colored beads (size 6 seed beads)
Robinson-Anton thread #3CC variegated (Autumn)
Transparent thread
All purpose thread
Pattern making paper
Fabric marking pen
Professional-Style Embroidery
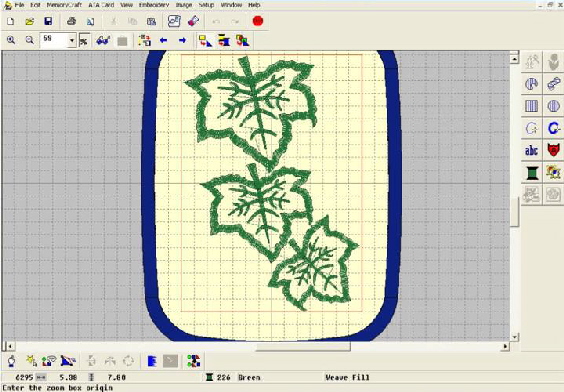
Open Digitizer 10000 EasyDesign.
Insert the MC8000 Embroidery Design Gallery CD ROM into your computer.
Import Design #1010 from the 10 Appliqué Series folder.
Transfer the design to the Memory Craft 10000 via USB, RS232C or ATA PC Card.
Press the Edit tab. Import the leaf into the Edit screen on the MC10000.
Press the Size key. Size to 120%. Press OK.
Press the Edit tab again. Press the Size key. Size to 120%. Press OK.
Save the enlarged design to the Built-in memory or an ATA PC Card.
Transfer the design back to Digitizer 10000 via USB, RS232C or ATA PC Card.
Open a New screen.
Click Setup. Click Work Environment. Select Hoop B.
Click Embroidery. Click Insert Design. Import the enlarged design.
Click Select.
Click Select Stitch While Traveling.
Using the Shift + Tab keys on the keyboard, forward through the design.
As the underlay, zig-zag and straight stitches are highlighted delete them from the design by pressing the Delete key on the keyboard.
Note: You will need to travel through the design a number of times to delete these stitches.
Click Reshape. Move the start stitch to the middle of the leaf vein to eliminate the loose jump stitches.
Click Edit. Click Select All.
Click Edit. Click Group.
Rotate the design and position in the upper right corner of the hoop.
Click Copy. Click Paste.
Click Object Details. Click Dimensions tab. Change the Width and Height to 80%.
Position below first leaf.
Click Paste again.
Click Object Details. Click Dimensions tab. Change the Width and Height to 60%.
Position below middle leaf.
Save design as an *JAN and *.JEF.
Click Edit. Click Select All.
Click Flip Along Vertical.
Save design as an *JAN and *.JEF.
Print templates of each design.
Transfer the designs to the MC10000 via USB, RS232C or ATA PC Card.
Tape the templates together to form the embroidery designs for the ends of the table runner.
Lay the templates under the pattern making paper to determine the final curved shape of the ends.
Add 2" to this line. This will be the cutting line for the table runner ends.
Create your full pattern for a 15" x 45" finished size.
Note: The finished measurement can be altered to your desired width and length for your table.
Transfer the design crosshairs to the paper pattern.
Lay the chiffon over the pattern.
Mark the crosshairs on the chiffon with a fabric marking pen.
Set up the MC10000 for Professional-Style Embroidery.
Thread the bobbin with transparent thread. Adjust the tension to 3.8.
Layer water-soluble stabilizer, chiffon, another layer of water-soluble stabilizer and the sparkle organza in the Large Hoop "B", using the Clothsetter for perfect placement.
Stitch one of the designs.
Continue to stitch designs until both ends of the table runner are complete.
Trim the sparkle organza close to the outside edge of the embroidery.
Carefully cut away the excess stabilizer. Rinse the design well to remove the stabilizer. Lay flat and let dry.
Construction
Cut the embroidered chiffon using the paper pattern.
Cut one table runner pieces from the satin and fall fabric using the paper pattern.
Back one of the satin runners with the iron on batting.
Layer the satin runner (with batting) and the embroidered chiffon, right side to wrong side. The transparent thread will be the rights side of the design.
Select a Straight stitch.
Thread the machine with transparent thread in the needle and bobbin.
Remove the foot holder to attach the beads around each leaf by machine.
Determine where to start and take a few stitches in place to secure the thread.
Place a bead under the needle. Hand turn the needle down the center and form a stitch in the middle of the bead.
Move the fabric in the direction the bead will be laying on the fabric. Take another stitch to lay the bead in the proper direction. Secure to fabric.
Move about 1/4" and place another bead.
Continue until all leaves are embellished with beads.
Attach the Zigzag Foot and foot holder.
Thread the machine with all-purpose thread.
Place the fall fabric runner right sides together with the embroidered piece.
Stitch around the table runner leaving an opening for turning in the middle of one side.
Notch the corners to reduce bulk. Turn the runner right side out.
Press carefully and at a low temperature so as to not to melt the monofilament.
At the opening press under the seam allowances.
Attach the Even Feed foot.
Thread the bobbin with the embroidery thread and needle with transparent thread.
Select the Sculpture stitch #72. Increase the tension.
Stitch around the table runner three times. Evenly spaced between the edge and the embroidery designs.
Bead the center stitching line using the same technique as on the leaves.
Cut the decorative cord in half.
Attach the large Beading foot.
Select Blind Hem stitch #14.
Attach the cord to the table runner, leaving 12" unattached to make the tassel.
Apply cording to both sides of the runner.
Bead enough beads on the thread to wrap around cording ends three times using a hand sewing needle and thread
Tie the cording together where they meet. Wrap thread around the cording tails and tie tightly.
Trim and fringe the cording to desired length.
Created by Valora Hammond, Educational Coordinator 11/03