Create your own art using any BERNINA® sewing machine, even the simple activa models. The activa model 230 offers the same legendary Swiss precision, high-quality standards, and gorgeous stitching you find on all BERNINA® machines! Look for step-by-step directions for companion art pieces made with the activa models 210, 220, and 240 in Through the Needle magazine and on the BERNINA® USA website sewing studio free projects). Remember, these great pieces can be made using any BERNINA® sewing machine, even an artista!
Supplies
10” square of pink/purple batik for background
1¾” x 44” piece of same pink/purple batik as above for binding (may be pieced if necessary)
3” squares of 3 different berry-colored quilting cottons for white pieced block
1½” x 1¾” piece of tan batik for lower left block
One 2¼” x 25/8” and one 2½” x 6” pieces of green/tan batik for right border and 1 block
8½” square quilting cotton for backing
35/8” square of dark pink batik for red square-in-a-square block
2” square of red batik for square-in-a-square block
¾” x 10” piece of different red batik for right border stripe
1¾” x 21/8” piece of intense pink quilting cotton
1½” x 2½” piece of deep rose batik for pintucked block
8½” square of Warm ‘N Natural Batting
Patchwork Foot with Guide #57
Reverse Pattern Foot #1
Bulky Overlock Foot #12
Pintuck Foot #31
Edgestitch Foot #10
Quilting/Seam Guide
Microtex needle Size 80
Microtex needle Size 100
2.5mm Double Needle
Variegated cotton thread in colors to coordinate with chosen fabrics
Monofilament thread
White cotton quilting thread
2 spools dark red cotton quilting thread
Hand-sewing needle
Straight pins
Approximately 1 yard variegated yarn trim
7 tubular metal beads, ranging in size from ¼” - ½”
Seven 3/16” square metal beads in copper, gold and silver
Approximately 20 gold seed beads
Glass beads in multiple colors of gold – larger than the seed beads
Gold pendant bead
2 gold novelty beads
3 gold novelty beads in a different size and shape than above
HRFive temporary spray adhesive
activa Art 230 Instructions
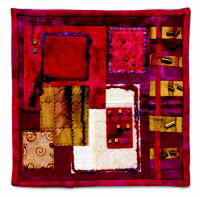
Note: Refer to the photo to see completed visuals of the techniques detailed here.
Create the Right Border
Insert a Microtex needle size 80 and place Foot #57 on the machine. Wind bobbin and thread machine with red cotton thread.
Cut 3 pieces of green/tan batik 2¾” wide, varying the height of each piece from 1” – 1¼”.
Cut a 2¾” strip from the 10” square of pink/purple batik background fabric. Set the remaining piece aside for use in step #19.
Slice the strip crosswise approximately 1½” from the top. The slice should be at a slight angle.
Insert one of the green/tan batik pieces into the slice in the background strip by stitching the long edges of the green/tan batik to the short edges of the sliced fabric.
Again, slice the background strip at a slight angle approximately 21/8” from the bottom seam.
Insert another piece of green/tan batik into the slice in the background strip.
Slice the background strip at a slight angle again approximately 2½” from the last bottom seam.
Insert another piece of green/tan batik into the slice in the background strip.
Trim the bottom of the pieced strip so that the strip is 10” long from the top edge.
Slice the pieced strip lengthwise approximately ½” from the left edge.
Insert the ½” x 10” long piece of red batik.
Cut 2 more pieces of green/tan batik 2½” wide, varying the height from 1” – 1¼”.
Slice the pieced strip crosswise approximately 1” below the bottom seam of the first green/brown batik piece.
Insert one of the pieces of green/brown batik.
Slice the pieced strip one last time crosswise approximately 1” above the top seam of the bottom green/brown batik.
Insert the last piece of 2½” wide green/brown batik.
Trim the bottom of the pieced strip so that it measures 10” long from the top edge.
Place the pieced border right sides together with the remaining piece of the pink/purple background fabric.
Trim entire piece to 8½” square. Try to remove as little fabric from the pieced strip as possible.
Layer the Background Fabric in Preparation for Quilting and Embellishment
Attach batting and backing fabric to pieced square with temporary spray adhesive. Note: For all remaining placement steps, bear in mind that the art square will be trimmed to a final dimension of 8” square.
Create the Pieced berry-colored Block
Cut the white-on-ivory fabrics into 3 strips. Piece fabrics together to create a block 3” x 4”.
Use temporary spray adhesive to attach the block to the lower right corner of the art square, next to pieced border.
Insert Microtex needle size 100 into the machine; thread needle with monofilament thread. Place Foot #1 on machine and insert the Quilting Guide into the back of the foot. Wind a bobbin of white cotton quilting thread. Do not thread the stitch finger on the bobbin case. Select Mock Hand Quilting Stitch #24. Adjust the needle tension for a Mock Hand Quilting stitch as directed in the sewing machine manual. All seam allowances are ¼”. Press after each seam.
Quilt the berry-colored pieced block to the art square with the Mock Hand Quilting stitch. Adjust the Quilting Guide to achieve an evenly spaced grid of quilting.
Insert Microtex needle size 80 into the machine. Thread needle with monofilament thread. Place Foot #12 on the machine. Choose a different thread color for the bobbin if desired. Select zigzag stitch #2. Reduce needle tension if it was altered for the Mock Hand Quilting Stitch.
Couch the yarn trim around the outside edge of the berry-colored pieced block by placing yarn under the groove in the bottom of Foot #12 and zigzag stitching over the yarn.
Create the Pintucked Block
Place Foot #31 on the machine and insert the 2.5mm double needle. Thread the machine with both spools of dark red cotton thread, being sure the separate the 2 threads at the tension disk. Change bobbin thread color if desired and thread the bobbin stitch finger.
Select the 1½” side by 2½” long piece of deep rose batik. Stitch pintucks across the fabric using the width of the presser foot to evenly space the pintucks.
Trim the pintucked fabric to 1¼” wide by 1¾” long.
Attach to the right side of the berry-colored block with temporary spray adhesive.
Insert Microtex needle size 80 in the machine and re-thread with 1 spool of dark red cotton thread. Foot #1 on the machine.
Select buttonhole appliqué stitch #26 and appliqué the pintucked block on top of the berry-colored block.
Create the Red Square-in-a-Square
Select the 35/8” square of dark pink batik and attach it to the upper left corner of the art square using temporary spray adhesive.
Select Feather stitch #28 and using the same thread and foot from the last step in the pintucked block, appliqué the dark pink batik piece to the art square.
Select the 2” square piece of red batik and attach it to the center of the dark pink batik with temporary spray adhesive.
Thread the machine with variegated cotton thread. Place #12 foot on the machine. Select zigzag stitch #2.
Couch the yarn trim around the outside edge of the red square by placing the yarn under the groove of Foot #12 and zigzag stitching over the yarn leaving “tails” in the lower left corner of the square. After stitching, tie the tails into a knot and trim to desired length.
Create the Green/Tan Block
Select the 2¼” by 25/8” piece of green/tan batik. Attach it to the lower left of the art square with temporary spray adhesive, overlapping the red square-in-a-square (refer to sample for placement).
Insert Microtex needle size 100 into the machine. Thread needle with monofilament thread. Place #1 foot on machine and insert the Quilting Guide into the back of the foot. Wind a bobbin of variegated cotton quilting thread. Do not thread the stitch finger on the bobbin case. Select Mock Hand Quilting Stitch #24. Adjust the needle tension for a Mock Hand Quilting stitch as directed in the sewing machine manual.
Quilt the green/tan piece to the art square with the Mock Hand Quilting stitch. Adjust the Quilting Guide to achieve an evenly spaced grid of quilting.
Without altering the machine setup or rethreading the machine, appliqué the green/tan piece along the outside edges with the Mock Hand Quilting stitch.
Create the Tan Batik Block
Select the 1½” wide by 1¾” long piece of tan batik and attach it to the lower left corner of the art square with temporary spray adhesive.
Insert Microtex needle size 80 in the machine and thread with variegated cotton thread. Change the bobbin thread color if desired and thread the bobbin stitch finger. Place Foot #1 on the machine. Select zigzag stitch #2 and adjust length to 0.4mm and width to 2.5mm to create a satin stitch. Reduce the needle tension if it was altered for the Mock Hand Quilting stitch.
Appliqué the tan batik to the art square.
Create the Intense Pink Quilting Cotton Block
Select the 1¾” wide by 21/8” long piece of intense pink quilting cotton and attach it to the upper right corner of the art square next to the right border with temporary spray adhesive.
Select stitch #49. Rethread the machine with a different variegated thread color.
Appliqué the intense pink quilting cotton to the art square with the straight edge of the stitch toward the outside of the block and the uneven edge of the stitch toward the center of the block.
Bind the Art Square
Trim the art square to 8” square removing as little fabric from the right border as possible.
Select the 1¾” x 44” piece of pink/purple batik for the binding.
Fold in half lengthwise and press.
Select straight stitch #1. Thread the machine with red cotton thread. Place Foot #57 on the machine. Unthread the bobbin stitch finger.
Place the binding fabric right sides together against the edge of the art square with the fold toward the center of the art square and the raw edges aligned.
Leave a 4” “tail” of binding at the beginning and stitch binding to art square with ¼” seam allowance, mitering the corners if desired. Stop stitching approximately 4” before first stitching.
Join binding with a ¼” seam allowance and trim excess fabric tails.
Finish stitching open area of binding to the art square.
Wrap the folded edge of the binding to the back of the art square and press. Secure the folded edge slightly beyond the binding stitching and hold in place with straight pins.
Place Foot #10 on the machine.
Stitch the folded edge of the binding by placing the art square right side up under the presser foot. The guide of the foot should be aligned next to the folded edge of the binding on the embellished side of the art square. Stitch in the ditch from the embellished side of the square, catching the folded edge of the binding on the back side.
Bead the Art Square
Note: Refer to the sample art square for bead examples and placement.
Attach tubular metal beads by hand to the green/tan batik fabrics in the right hand border.
Attach square metal beads to the pintucked block with hand stitches.
Attach gold seed beads to the green/tan block by hand or machine.
Attach larger gold glass beads to the tan block by hand.
Attach a large gold pendant bead by hand to the yarn knot on the red square-in-a-square block.
Attach 2 gold novelty beads by hand to the upper left corner of the red square-in-a-square block.
Attach 3 gold novelty beads by hand to the intense pink block.