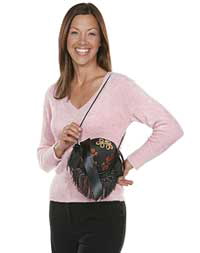
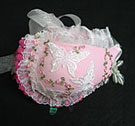
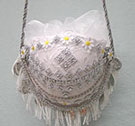
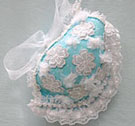
One of the latest fashion crazes among the art community is this purse made from a bra. All you need is a bra, some miscellaneous embellishments, a closure for it, ribbon or cord for the strap and you too can make a fashion statement. There are contests and challenges happening throughout the U.S. and Canada for decorated bras and purses, all to raise awareness to Breast Cancer. Ours is made with an inexpensive padded, strapless bra (bought at a discount department store). The larger the cup size, the larger the actual purse. We found that the B or C cup works best. Make one for yourself and be prepared for no one to believe it was a bra at one time!
Materials
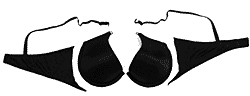
1 Regular or strapless, padded, underwire bra
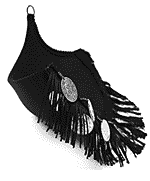
Wrights® miscellaneous trimming, ribbon, appliqués, frogs, tassles, tassles with cord. Measurements should be based on the length of the underwire portion of one side of the bra. Keep in mind that one trim will go over the underwire seam on both sides.
Fabric glue or needle and thread
Instructions
1. Open bra and cut away the straps and the elastic back.
2. Position trims and appliqués randomly over the cups, glue or hand tack down.
3. Starting on one cup, begin layering trims. Position them, (on the inside) starting and ending over the seam where the underwire begins and ends. Glue or tack them down individually. Hint: Layer them balanced, starting with a shorter trim down to a longer one and up again to the shorter one. Save one trim to go over the outside to cover the underwire seam on both cups.
4. Fold the second cup of the bra over the trims and glue or tack forming the "purse."
5. Glue or tack final trim OVER the underwire seam on both cups of bra.
6. Measure desired length and add a piece of trim, ribbon or a cord with tassels for the "strap". Glue or tack at either end of the cups. OR for a wristlet handle, add a loop of stretchy lace or cord to the original findings from the bra strap.
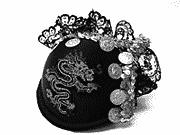
7. Center and glue two pieces of trim, ribbon or cording to each side of purse, tie loosely in bow for closure.
Do not limit the use to purses only. Use them as party favors or make several and fill with sachet or potpourri to hang decoratively in your closet. Or use as a perfect holder/ wrap for a gift card or small gift!