|
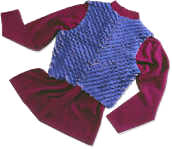
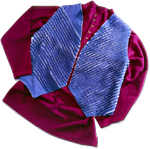 For those of us who have a huge stash of fabric or simply want an excuse to buy more, this vest is the perfect project. Originally shown on Aleene's "Creative Living with Crafts," the Chenille Vest from Janome uses six layers of rayon challis fabric in a variety of prints and solids. To create this quick and simple project, fabric layers are sewn together in 45-degree angle rows. The top five layers are then cut in between the rows, leaving the bottom layer of fabric uncut. Once you have machine-washed and dried the fabric you are ready to cut out any basic three-piece vest pattern of your choice. It's an easy project since the vest is not lined and the edges and seams are left unbound. For those of us who have a huge stash of fabric or simply want an excuse to buy more, this vest is the perfect project. Originally shown on Aleene's "Creative Living with Crafts," the Chenille Vest from Janome uses six layers of rayon challis fabric in a variety of prints and solids. To create this quick and simple project, fabric layers are sewn together in 45-degree angle rows. The top five layers are then cut in between the rows, leaving the bottom layer of fabric uncut. Once you have machine-washed and dried the fabric you are ready to cut out any basic three-piece vest pattern of your choice. It's an easy project since the vest is not lined and the edges and seams are left unbound.
These project instructions are specific to a Janome machine; however; the project can be adapted for use on other machines.
 Janome Supplies Required Janome Supplies Required
- Any Janome machine
- Janome embroidery thread to match the top layer of fabric
- Walking Foot
- Quilting Bar
- Universal #14 Needle
Fabric and Notions
- Commercially purchased vest pattern
(Note: Use any 3-piece vest pattern with a back, and front with no darts. McCalls and Simplicity are only two brands that usually carry a basic vest pattern.)
- 6 pieces of fabric that are a 1/4 yard larger than the pattern requires
(Note: The fabric can be any natural fiber. Man-made materials, such as polyester, do not work well.)
- 45-degree angle ruler
- Fabric marker
Instructions
Fabric Preparation
1. Layer the six fabric pieces on a flat surface. Remember that the bottom layer will be the inside of the vest.
2. Lay the pattern pieces on top of the fabric. Trace around the pattern pieces, leaving approximately 2" around each piece. The pattern will be re-cut after creating the chenille effect.
3. On the two front pieces, mark the sewing line on the bias using the 45-degree angle ruler, creating a chevron shape that meets in the center front. On the back piece, mark a line down the center. Repeat, marking a 45-degree line, again creating a chevron shape.
4. Pin all layers together so they will not shift when you cut. Cut pattern pieces apart on the lines drawn in instruction #2. DO NOT CUT between the 45-degree marks at this time.
Sewing and Cutting
5. Thread your Janome machine with Janome embroidery thread, matching the color of the fabric being used. It may be beneficial to adjust the pressure on the presser foot. This feature, as well as the unique box feed system on your Janome, will allow you to sew all six layers of fabric with ease.
6. Attach the walking foot with quilt guide and begin sewing one cutout section at time, stitching on the line drawn from one end of the fabric stack to the other.
7. Set the quilt guide on your walking foot for 1/2" spacing, aligning the quilt guide on the line of stitching you have just sewn. The parallel stitching lines must be sewn consistently 1/2" apart. Remove the pins as you sew, until the fabric pieces are covered with parallel stitched lines.
8. Using a sharp pair of scissors, cut through the top five layers of fabric between the stitched rows. Be sure not to cut the bottom layer.
9. When you have finished cutting, sew around the outside edges of each piece to prevent fraying.
10. Machine wash and dry all three pieces. This process will give the pieces a chenille look.
11. Place the pattern pieces on the corresponding fabric piece and re-cut to exact size.
12. With wrong sides together, sew shoulder seams and side seams.
Note: You may like to finish your vest with contrast bias binding or other type of decorative finish.
Created by Kelly Lundquist,
Necchi/New Home Sewing Center, Rockford, IL
3/04
|


