|
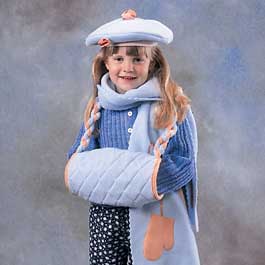 This beret, muff, and scarf will keep your little girl nice and warm. The scarf has decorative ends and optional mitten appliqués; the muff is quilted with outerwear fleece and batting; and the beret is decorated with roses. The beret will fit girls up to age 5. This beret, muff, and scarf will keep your little girl nice and warm. The scarf has decorative ends and optional mitten appliqués; the muff is quilted with outerwear fleece and batting; and the beret is decorated with roses. The beret will fit girls up to age 5.
Notes:
- 1/4" (0.6cm) seam allowance used
- RST = right sides together
- WOF = width of fabric
Beret
Beret Materials
- 1/3 yard OR 12" x 22" (30.5cm x 55.9cm) piece of outerwear fleece
- 3" (7.6cm) ribbing
- 1/3 yard OR 10" x 7" (25.4cm x 17.8cm) piece of coordinating cotton print
- Thread to match
Cut
- Two 11" (27.9cm) circles of fleece
- One 3" x 17" (7.6cm x 43.2cm) piece of ribbing
- Cotton print as directed on patterns for roses
 Directions Directions
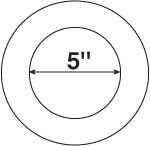
1. On one of the circles, cut a 5" (12.7cm) circle from the center and discard. The outer circle will now be the beret underside brim.
2. RST, stitch ribbing at short ends. With wrong sides together, fold ribbing in half lengthwise and quarter mark with pins.
3. Quarter mark inside circle. With RST, match ribbing to inside circle at pins, stretching if necessary. Stitch. Turn right side out.
4. With RST, match circles and stitch outside edges of beret. Turn right side out. Press lightly.
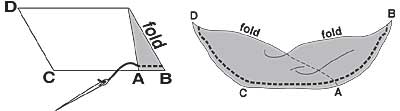
5. Roses: With wrong side of fabric up, fold "A" down to edge of "CB". Make a running stitch from "B" through both layers to "A". Bring edge "DA" even to "CAB" and continue running stitch until you reach "D".
6. Gather so piece measures 6" (15.2cm) for large rose, or 4" (10.2cm) for small rose. Roll up rose from one end to the other and secure with stitches.
7. Hand stitch the large rose to the top center of the beret, and the small rose to the beret inside brim near the outside edge.
Muff
Muff Materials
- 3/8 yard (.34m) each of two outerwear fleece fabrics
- 3/8 yard OR 12" x 17" (30.5cm x 43.2cm) piece of cotton batting
- thread to match
- removable marking pen/pencil
Cut
- 12" x 17" (30.5cm x 43.2cm) piece of both outerwear fleece and batting
- 1" x 60" (2.5cm x 152.4cm) piece of each outerwear fleece color for neck cord
Directions
1. Pin wrong side of outerwear fleece pieces to each side of batting.
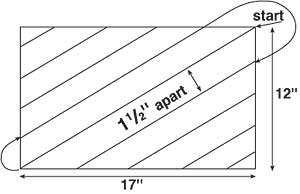
2. Using marking pen/pencil and following the diagram below, mark the fleece.
3. Set your sewing machine for a narrow zigzag stitch and match thread to fleece colors. Following the diagram above, start to sew, alternating stitching direction until finished with all rows.
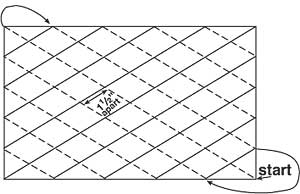
4. Using marking pen/pencil, mark the fleece in the opposite direction to create a diamond effect.
5. Repeat Step 3. Gently stretch fabric when finished with stitching to puff up fabric.
6. Decide which quilted side will be the outside of muff. Cut two 1-1/2" x 18" (3.8cm x 45.7cm) pieces of fleece the color of inside of muff to bind the raw edges of the muff, which is done in step 12.
7. With RST, stitch the 12" (30.5cm) muff edge. Turn right side out.
8. Safety pin together the short ends of the 1" x 60" (2.5cm x 152.4cm) pieces of fleece.
9. Holding onto the pinned edge, and stretching the fleece, twist the two colors together.
10. Allow the twisting fleece to twist back onto itself making a thick, soft cord. Pin each end.
11. Opposite the muff seam, and RST, pin the cord ends to muff having edges even. Baste.
12. Fold binding over raw edges of muff. Using a narrow zigzag stitch, stitch binding in place overlapping ends and trimming length as necessary. Trim close to stitched edge.
Scarf
Scarf Materials
- 3/8 yard (.34m) outerwear fleece
- thread to match
Optional
- Olfa® pinking cutter
- 1/8 yard OR 4" x 21" (10.2cm x 53.3cm) piece of outerwear fleece for mitten appliqués
- 1 yard (.91m) 1/4" (0.6cm) ribbon
Cut
- 13" x 60" (33.0cm x 152.4cm) piece of outerwear fleece
- Fleece as directed on pattern above
Directions
1. Pin appliqués in place at scarf ends. Machine stitch in place using matching thread.
2. Optional: Using the Olfa®pinking cutter, trim edges.
3.Optional: Cut two pieces of fleece in the shape of small mittens. Pin each mitten approximately 12” (30.5cm) from scarf ends and stitch in place, leaving the top edge open. Pin ribbon end under open edge of one mitten, across length of scarf, with opposite ribbon end under open edge of second mitten; stitch in place. (Refer to project photo to see how our mitten is placed on scarf.)
2/04
|