|
The color, texture, and shape of fleece edges can create an extra-stylish touch that gives your work a special look. Directions are for creating a separate fleece trim that can be applied to your garment or project by machine sewing or with fabric glue (Fabri-Tac ®). But these techniques are sure to give you ideas of how to creatively finish the edges of any fleece project.
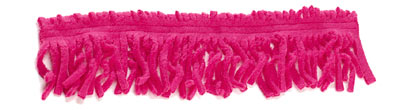
Basic Fringed Edge
1. Cut strip of fleece 3-1/2” wide x length needed, cutting across the width of fabric (from selvage to selvage). If more length is required, piece together two or more strips with small seams.
2. Stitch along one long edge with 5/8” seam allowance. Stitch again 1/4” from first row of stitching.
3. With scissors or rotary cutter and ruler, cut fringe every 1/4”, being careful not to cut through stitching.

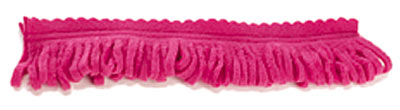
Basic Curly Fringed Edge
1. Cut strip of fleece 3-1/2” wide x length needed, cutting along the length of fabric (parallel to selvage). If more length is required, piece together two or more strips with small seams.
2. Stitch along one long edge with 5/8” seam allowance. Stitch again 1/4” from first row of stitching.
3. With scissors or rotary cutter and ruler, cut fringe every 1/4”, being careful not to cut through stitching.
4. Gently pull fringed edges to stretch and curl fleece.
NOTE: If you want curly fringe, be sure to cut strip along the length of fabric (parallel to the selvage). Fringe that has been cut across the width of fabric (from selvage to selvage) will not curl.
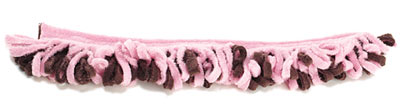
Single-Color Looped Fringe
1. Cut a 6”-wide strip (see Note above). Piece as needed to obtain length required.
2. Fold strip in half. Stitch 1/2” from raw edges. Stitch 1/4” from first row of stitching. If desired, trim raw edges with rotary cutter using scalloped or pinking blade.
3. Cut fringe every 1/4”, being careful not to cut through stitching.
4. For curly-looped fringe (if strip has been cut along the length of fabric), gently pull fringed edges.
Two-Color Curly Looped Fringe
1. Cut two strips from coordinating colors as for Single-Color Looped Fringe.
2. Layer strips, and continue as above.
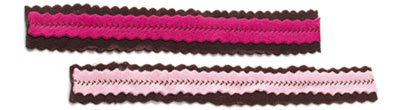
Two-Color Scalloped Edge Trim
1. Using a scalloped edge blade in your rotary cutter, cut one strip 1” wide x length needed. From coordinating fleece, cut one strip 1-3/4” wide x length needed.
2. Using a decorative stitch and coordinating color thread, stitch down the center of narrow strip. Glue decorated strip to wider strip. You can also stitch both strips together using a decorative stitch, although some of the stitching design may get lost in the pile of the fleece. Experiment to obtain the results you desire!
3. Hint: Cutting the strips a little wider than needed and trimming after stitching helps to get a more uniform look.
Gathered Strip
1. Cut strip 2” wide x two times length needed. Using a long stitch length, sew straight down the center of the entire length of strip. Pull bobbin thread to loosely gather. Set aside.
2. From coordinating fleece, cut one strip 1” wide x length needed. Using a decorative stitch and coordinating color thread, stitch down center as desired. Cut long edges of strip to create a 1/2”-wide strip. Glue down center of gathered fleece strip.
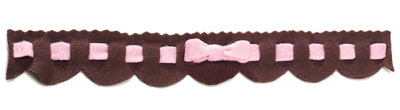
Scalloped Edge with Woven Bow
1. Cut strip 4” wide x length needed. Using Fancy Fleece Ruler and rotary cutter with straight blade, cut large scallops along one long edge. Using Fancy Fleece Ruler, cut weaving slits along center of strip. Cut remaining long edge using rotary cutter and scalloped edge blade.
2. From coordinating fleece, cut strip 1” wide x length needed + 12” for bow. Tie bow and place in center of strip. Weave 1” fleece strip in and out of slits, working from center to ends. Stitch or glue ends in place.
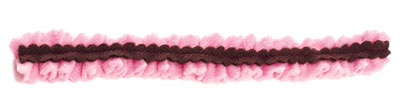
Woven Ribbon Trim
1. Cut strip 3” wide x length needed, using scalloped blade in rotary cutter if desired. Using Fancy Fleece Ruler, cut weaving slits across center of strip.
2. Cut two 1/2”-wide strips of coordinating fleece. Weave strips alternately through slits. Stitch or glue ends in place.
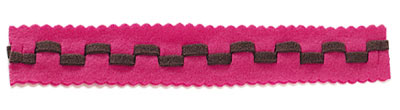
Ribbon Woven Zigzagged Edge Trim
1. Cut strip 3-3/4” wide x length needed. Using Fancy Fleece Ruler, cut long edges of strip to create zigzag cut edge as follows: place alignment line on raw edge of fleece; then placing rotary cutter blade between slots in ruler, cut the zigzag edge.
2. Using Fancy Fleece Ruler, cut weaving slits across center of strip.
3. From coordinating fleece, cut strip 1” wide x length needed, using a pinking blade if desired. Weave fleece strip through slits. Stitch or glue ends in place.
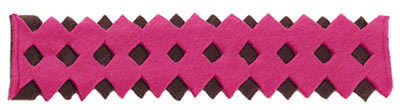
Diamond Cut-Out Trim
1. From two pieces of coordinating fleece, cut strips 4” wide x length needed.
2. Fold top strip of fleece in half lengthwise. Align Fancy Fleece Ruler with folded edge of fleece. Using rotary cutter, cut through designated slots to create diamond cutouts. Keeping strip folded in half and using ruler, cut zigzag edges. Set aside.
3. Fold coordinating strip in half lengthwise. Using Fancy Fleece Ruler, cut zigzag edges.
4. Staggering zigzag points, align two strips. Stitch or glue strips together.
Disclaimer: ©2005 Jo-Ann Stores, Inc. Due to seasonal nature of projects, supplies are available for a limited time only. Please read all instructions prior to beginning; read and follow all manufacturers' instructions for all tools and materials used. Provide adult supervision if children participate in this and all craft projects. Because Jo-Ann Stores, Inc. and Joann.com have no control over the use of materials and tools, nor surroundings, during construction of projects, Jo-Ann Stores, Inc. and Joann.com disclaim any liability for injury, damage or other untoward results. Content of this project sheet is presented in good faith, but no warranty is given, nor results guaranteed.
1/06
|