|
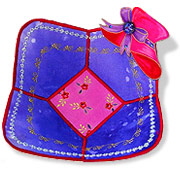
Keep those sewing tools organized near your machine in real "Red Hat" style! Now the feet, threads, needles, scissors, bobbins and trims will not get away from you as you progress through stages of a project. While hoop embroidery can be added to the fabric before making up the bowl, this useful tool gets its "pow!" from pressing, sewing, gluing and cutting readily available fabric and trims. The bowl starts with a 7 1/2" square but you can make these in any size. Great, too, for stashing the needle you swapped but want to replace when the bowl is finished.
Materials
- Brother sewing machine
- Microtex needle
- Fabric Bowl instructions from Fast Fun & Easy Fabric Bowls by Linda Johansen, published by C&T Publishing, www.ctpub.com
- Open Toe foot (SA147)
- Two main squares fabric, different prints 7 1/2"
- Two squares for centers 2 1/2"
- One 7 1/2" square stiff stabilizer (Timtex, Better Bowl Stuff or 2 layers heavy cotton canvas)
- Fusible web to go under fabric pieces (Wonder Under, Steam A Seam 2 or similar weight which can be sewn through) Two - 7 1/2", Two - 2 1/2"
- Matching thread for needle and bobbin (such as Brother poly or cotton, in solid or variegated)
- Heavier threads for bobbin if using bobbin work
- Jewels, ribbons and fabric glue (optional)
These project instructions are specific to a Brother sewing machine; however, the project can be adapted for use on other machines.
Step 1: Apply fusible web to back of large squares. Press one fusible web-backed piece of fabric to one side of stiff stabilizer. Press the other fusible web-backed piece to the other side. Apply fusible web to two smaller squares and trim edges.
Step 2: Trim large "sandwich" to 7" square. Curve corners if desired, using spool base to shape.
Step 3: Draw center line from top to bottom and side to side with chalk or washable pen on one side of 7" square.
Step 4: Postion smaller square over the center and press in place. Outline with straight stitches using the Open Toe foot (SA147).
Step 5: Turn "sandwich" over and position other contrasting fabric square within the outlined area. Press down. Turn bowl over and with Open Toe foot, anchor smaller squares with zigzag (satin) stitch.
Step 6: Try a satin stitch width of 3.5 mm and 0.3 mm length for poly threads and 0.4 mm for cottons. Trim any threads or extra fabric and stitch again at 4 mm wide. (Using 4.5 and 5 mm width may be easier on your first bowls.)
Step 7: Measure 1/2" in at top of each side of the lines drawn on the fabric. Narrow to just outside the area you satin stitched and cut a "V" on each side. Place your Open Toe foot at the center and slowly satin stitch over the cut edges as you pull them together. Stitch again at the wider setting you chose to use. (This shapes the bowl and the "V" can be different sizes to get other effects.) The sample used a solid poly (Brother 107) to cover the outer edge but variaged looks good, too.
Step 8: Position the Open Toe foot so the zigzag covers the edge and interlocks to make a smooth finish. Stitch around the bowl. Trim any extra threads and stitch again at the wider width.
Step 9: Embellish as desired. You can use bobbin work to make a fancy trim along the edge as well as built-in machine stitches. (See Photo 2)
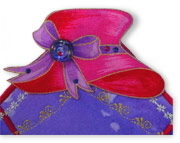
Step 10: To add the hat, apply fusible web to the back of fabric with the hat you want and then another backing fabric. Cut the hat shape out and apply with fabric glue. Sew or glue beads and ribbons to hat or use hot fix jewels as trim. (See Photo 3)
Early Irwin, Education Consultant
07
|