|
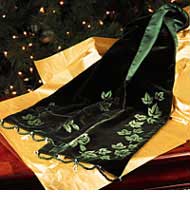
 This elegant garment will warm the hearts of your loved ones. Or make this one-of-a-kind scarf to match your special holiday apparel. This elegant garment will warm the hearts of your loved ones. Or make this one-of-a-kind scarf to match your special holiday apparel.
Supplies
- 1-1/2 yards rayon velvet
- 1-1/2 yards lining fabric
- Thread
- Iron and pressing cloth
- Nylon beading thread and beading needles
- 2 Darice® acrylic drop crystals
- Backstreet Stamps: rose and ivy, or any other stamps of your preference
- Glick® beads:
- package Green, size 6/0
- 1 package 4mm Glass firepolish
- 1 package 6 mm Glass wafers
Directions
1. Cut one 9-1/2" x 52" rectangle from velvet and lining.
2. Before assembling velvet and lining, emboss velvet (Steps 3-9).
3. Preheat iron to medium-hot temperature. Do not use steam.
4. Place rubber stamp face up on ironing board.
5. Place velvet nap side down on stamp.
6.Cover with presscloth; mist lightly.
7. Press velvet onto stamp for 15 seconds. Do not move iron around on stamp.
8. Lift iron off and peel fabric back to reveal stamped design.
9. Continue to place designs as desired.
10.After velvet is completely embossed, assemble scarf.
11. Using a 1/2" seam allowance, stitch scarf to lining, leaving a small opening to turn.
12. Trim seam allowances and clip corners. Turn scarf right side out and slip stitch opening. Finger press.
13. Bead scarf as follows, referring to photo below.
14. Measure and mark each scarf end into fourths.
15. Cut 36" length of nylon beading thread, and secure to corner of scarf.
16. Thread 25 green beads and take a small stitch at first mark to secure beading.
17. Continue across scarf, securing each group of green beads with small stitch.
18. At corner, thread a firepolish bead, a glass wafer, and another firepolish bead. Pass thread back through wafer and last bead.
19. Take a small stitch on scarf end. Pass thread back through first loop of green beads, and repeat firepolish and wafer pattern.
20. Pass thread through second loop of green beads.
21. For center design, form drop as follows: thread 2 firepolish beads, 1 wafer, 2 firepolish beads, 1 wafer, and the acrylic crystal. Pass thread back through drop pattern to secure.
22. Finish third and fourth loops repeating firepolish and wafer pattern and secure thread.
11/04
|

