Sew quick and easy faced patch pockets in almost any shape you can imagine: sew animal faces, geometric shapes, flowers, or enlarged motifs from the garment fabric itself. Two tightly spaced rows of stitching make it possible to trim seam allowances close, leaving crisp and smooth edges, even on curves, inner corners, and points.
Materials Needed
Use stable woven fabrics for best results. Back lightweight knits with fusible interfacing, and face them with a woven fabric. Plan the pocket design diameter to be at least 4" (10.2cm), and determine the location of the pocket opening. For added interest, place the pocket at an angle or embellish it with stitching lines, embroidery, appliqués, or buttons.
This project and others can be found in the Sewing for Children volume of the Singer Sewing Reference Library by Creative Publishing International.
Instructions
How to Make a Faced Patch Pocket
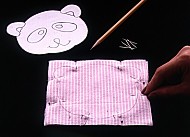
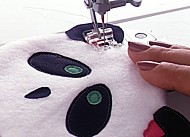
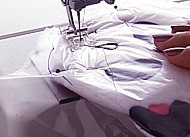
1. Draw pocket design on paper; cut out. Check size and placement on garment. Trace pocket shape on wrong side of pocket fabric; note: if pocket is asymmetrical, trace mirror image. Draw short perpendicular line at each inner and outer corner. Layer traced pocket fabric on lining fabric, right sides together; pin.
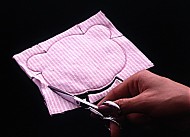
2. Stitch on marked line around entire design, using short straight stitches. Stitch second row of stitches just outside first row, tapering stitches into first stitching line at corners. Clip to stitching line at corners; trim fabric away to within 1/8" (0.3cm) of stitches.
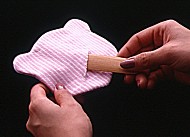
3. Cut small slash in lining, near lower edge. Turn pocket right side out through slash. Use point turner as necessary to smooth outer edges; press.
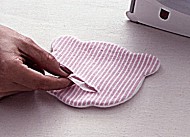
4. Fuse slash closed using small strip of fusible interfacing. Embellish pocket as desired. Pin to garment; edgestitch, reinforcing stitches at opening
Embellishment Techniques
Appliqués. Apply appliqués, or use raw-edge method.
Design lines. Draw design lines on water-soluble stabilizer; pin to pocket front. Stitch over design lines, using short straight stitches or short narrow satin stitches.


 General Sewing