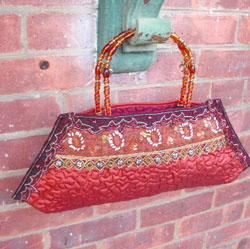
This is one of the coolest projects, so easy to do, with only a little sewing involved and most of it can be done by hand. This purse is made with a place mat so all the edges are finished and with the wonderful selection of place mats in the domestic departments of Wal Mart, Target, even JC Penney or Marshalls — the choices are endless! Be sure to purchase more than one because when you start you will want to make several of these purses. You can add to the interest and look of your purse by turning the placemat the long way or the short way, or any way. You are sure to be the talk of the town, especially when you tell everyone you made it yourself!
Materials:
1-1/4 yds Wrights® Finish Trim for Edge (#186-4177-001)
1/2 yd Wrights® Decorative Trim for Face (#186-4173-001)
1/2 yd Wrights® Decorative Trim for Face (#186-3332-092)
1 Pre-made Place Mat
1 pkg Purse Handles (or wire and miscellaneous beads)
Instructions
Fold place mat in half lengthwise; pin across top to hold in place.
Starting at bottom corner, make a 45° angle cut.
Starting with edge trim at top, layer and sew face trim (See photo).
Tuck in bottom corners 2" and sew raw edges (1/4" seam), wrong sides together.
Starting at top, lap 1" to inside, position trim over raw edges (approximately 1/4"). Stitch along the edge and up the front and back lapping final 1" inside as before.
At each side, stitch top folded trim edges together.
Attach handles according to manufacturer's instructions or create handles with your own beads and wire.