 Materials Materials
- Polka dot background: 5/8 yd.
- Green borders/sashings: 2/3 yd.
- Stripe for frames: 1/3 yd.
- Assorted Prints for Cats: 4 fat quarters
- Binding: 1/3 yd.
- Backing: 1 yd.
- Batting: Craft or crib size
- Fat Cats! Tool from Wrights
- 8 buttons, various sizes, for eyes
- narrow rick-rack for whiskers
- Fusible webbing 1 yd.
- Variegated thread for embellishment
- Stabilizer fabric or paper
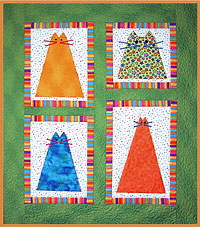
Finished size 31" x 38"
Cutting Directions for the Cats
Using the Fat Cats tool on the paper side of the fusible web, draw 4 different size cats. Also draw triangles for the cats' ears, making them as large or as small as you wish. Roughly cut out the shapes, leaving at least 1/4" around the outside of the drawn line.
Tip: If you prefer a "softer" appliqué, cut out the centers of the shapes, leaving at least 1/4" of fusible webbing inside the drawn line.
Fuse the webbing to the wrong side of the fabrics chosen for the cats, following the manufacturers' directions.
Cut out the cats and ears on the marked lines. Set aside.
Cutting Directions for the Background
From the background polka dot fabric, cut 2—9-1/2" x 42" strips. From these strips, cut:
- 1—9-1/2" x 15-1/2" rectangle
- 1—9-1/2" x 13" rectangle
- 1—9-1/2" x 12-1/2" rectangle
- 1—9-1/2" x 9-1/2" square
Assembling the Blocks
Fusing: Match the size of the cats to the background rectangles. Remove the paper backing and fuse the cats to the background rectangles, tucking the ears under the top of the head, and leaving at least a 1/2" margin around the cats.
Decorative Stitching: Set your sewing machine to sew a medium-size zig-zag stitch. Drop the feed dogs (darning mode), and put on a zig-zag or buttonhole foot. If desired, put variegated thread on the top. Pin a piece of stabilizer larger than each of the cats to the back side of the blocks (if you don't have stabilizer, any lightweight paper can work).
Since the feed dogs are dropped, you can control the length and placement of the zig-zag stitch. Stitch an irregular zig-zag over the edges of the cats and their ears.
Whiskers: Using rick-rack cut into short lengths, glue the whiskers in place on the cats. When the glue has dried, you can use a small zig-zag stitch and matching or invisible thread and feed dogs UP to stitch over the rick-rack to secure it in place.
Eyes: Mark the placement of the eyes on each cat, then sew buttons in place.
Cutting Directions for the Frames and Border
From the striped fabric, cut 6-- 1-1/2" x 42" strips. From those strips cut:
- 8—1-1/2" x 9-1/2" rectangles
- 2—1-1/2" x 11-1/2"
- 2—1-1/2" x 14-1/2"
- 2—1-1/2" x 15"
- 2—1-1/2" x 17-1/2"
From the green border fabric, cut 2—2-1/2" x 42" strips. From these strips cut:
- 1—2-1/2" x 11-1/2" rectangle
- 1—2" x 11-1/2" rectangle
- 1—2-1/2" x 30-1/2" rectangle
From green border fabric cut 4—4" x 42" strips for outer border.
Assembling the Quilt
Frames: Sew 1-1/2" x 9-1/2" striped rectangles to the top and bottom of all the blocks. Press toward the striped border. Sew striped rectangles to the sides of each of the blocks, matching the correct size rectangles to the blocks. Press toward the striped borders.
Sashing:Using the largest cat and the smallest cat blocks, sew a 2-1/2" x 9-1/2" green rectangle between the blocks (refer to the photo). Press toward the striped border. (NOTE: There are two different size green rectangles, use the larger one.)
Using the remaining two cat blocks, sew a 2" x 9-1/2" green rectangle between the blocks. Press toward the striped border. At this point the two cat strips should measure 30-1/2". Sew the green 2-1/2" x 30-1/2" rectangle between the two vertical rows of cats. Press toward the striped borders.
Borders: Using the 4" x 42" green strips, measure and trim two borders the width of the quilt. Sew the borders to the quilt, pressing the seams toward the striped borders.
Using the 4" x 42" green strips, measure and trim two borders the length of the quilt. Sew to the sides of the quilt, pressing toward the striped borders.
Finishing the Quilt
Trim the backing to 4" larger than the quilt top. Trim the batting the same size as the backing. Layer the backing wrong side up, the batting, and the quilt top right side up. Baste together. Quilt as desired.
The quilt shown was machine stitched in the ditch around the cats and around the frames, inside and out. A simple design was quilted in the outer border.
Binding
From binding fabric cut 4—2-1/4" x 42" strips. Trim off selvage, and join the binding strips with diagonal seams pressed open. Fold the binding in half, wrong sides together and press to make a double binding.
Before binding, hand-baste a scant 1/4" from the edge of the quilt to hold the layers together. Matching the raw edges of the binding to the raw edge of the quilt top, sew the binding to the quilt, mitering the corners.
Trim excess batting and backing, turn the binding to the back side and stitch down by hand with matching thread.
Project by Darlene Zimmerman
|


