|
 Marcus Brothers’ HEART TO HEART fabrics designed by Kym Bowles is the perfect group for this light-hearted quilt design, which was developed by the Quilting Hens. “It may look challenging, but if you take it one step at a time, you'll have a heartfelt quilt of your own in no time,” says Charlotte O'Leary, who owns Quilting Hens along with her design partner Mary Mejia. Some of these blocks are paper pieced, and you will need multiple copies of each block. They can be photocopied using the templates below. The finished block size is 4”. Marcus Brothers’ HEART TO HEART fabrics designed by Kym Bowles is the perfect group for this light-hearted quilt design, which was developed by the Quilting Hens. “It may look challenging, but if you take it one step at a time, you'll have a heartfelt quilt of your own in no time,” says Charlotte O'Leary, who owns Quilting Hens along with her design partner Mary Mejia. Some of these blocks are paper pieced, and you will need multiple copies of each block. They can be photocopied using the templates below. The finished block size is 4”.
R22 HEART TO HEART fabrics (or your choice)
- G722-126W2-1/8 yards
- G722-161W2-1/4 yards
- G724-146W1/4 yard
- G789-112W3/4 yard
- G721-146W24 motifs, approximately 2 yards
- G789-112W1-3/8 yards
- G721-112W3-1/4 yards for non-cut borders
- G789-146W2 yards
- G723-112W4 yards for backing
- Heart to Heart templates
Block Guide and Instructions
|
1. 16 blocks

|
2. 16 blocks

|
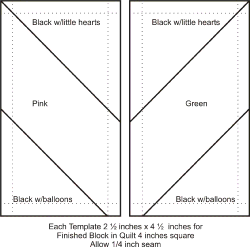 3. 52 blocks 3. 52 blocks
Sew the above blocks using the numbers for the appropriate sequence. (We used pink on the left and green on the right with the black to make the ribbon twist, Block #3.)
Hennie’s Paper Piecing Tips
- I love Paper Piecing. You get accurate, intricate blocks that are “no-brainers.”
If you use a photocopier to make your patterns, make them all at the same time so that the patterns are same size.
- Use lightweight copy paper. It is easier to see through, folds cleanly, and when the project is complete, tears off more easily. It's also cheaper than regular office paper.
- When sewing a seam, finger press the seam to one side, opening the fabric across the square. There will be extra fabric hanging out past the next seam line. Fold the paper back to the right side on the sewing line of the next seam, using that folded line as a guide. Then trim away the excess fabric, leaving a 1/4” seam allowance for the next seam. The fabric line is more apparent for the next seam and the folding of the pattern also weakens the paper, which makes it easier to tear out later on.
- Use a short stitch length to stitch the seams. This keeps the seams from coming un-sewn as the fabric is manipulated for the following seams. It also helps to perforate the paper, making it easier to remove later.
|
 4. 4 blocks 4. 4 blocks
Cut four 4” squares from the background. Cut a bias strip 1-1/4” wide from the green. Using a 1/4” seam allowance, sew a tube. Lay the tube on the block similar to the pattern provided, matching the bottom of the heart and the stem in Pattern #2. Stitch the stem down using appliqué stitch on each side of stem
|
|
 5. Drunkards Path 5. Drunkards Path
Create the following blocks with the templates provided:
- 20 blocks pink and white-ground floral
- 16 blocks green and black
|
|
 6. 1/2 triangle blocks 6. 1/2 triangle blocks
Create 4 Blocks as follows:
- Cut two 5” squares from the black, and two from the pink. Draw a diagonal line across the pink squares. Place each pink square on the black square, right sides together. Stitch 1/4” on either side of the diagonally drawn line. Press to set the seam. Cut on the diagonal line. Open and press, squaring blocks to 4”. This creates four pink-and-black 1/2 triangle squares.
|
|
 7. 1/4 triangle blocks 7. 1/4 triangle blocks
Create 44 Blocks as follows:
- Starting with 5-1/2" squares, make twenty-two 1/2 square triangles out of black and pink, and twenty-two out of pink and the background fabric.
- Place one pink-and-black triangle over each pink-and-background fabric, making sure the pinks are on opposite sides. Draw a diagonal line again; sew with 1/4” seam; press; cut and square to 4” blocks.
|
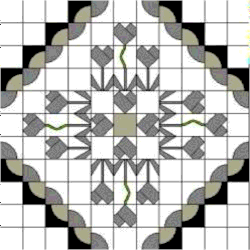 Layout Layout
1. Using a design wall or a large sheet on the floor, lay out the center part of the quilt. There are numerous plain 4” blocks. (We used some fussy cut designs.) Lay out the center portion of the quilt as shown below. Sew rows, starting at the top left hand corner and continuing across the top.
2. When all the rows are completed, sew row one to row two, row two to row three, etc.
3. Cut 1” strip of fabric for Border # 1. Stitch on left and right of the center medallion, and then to the top and bottom of the center medallion.
4. Using the prepared blocks, lay out as shown here.
Stitch in rows. Sew rows together and then stitch so each side of center medallion.
Lotta’s Sewing and Finishing Tips
- Sew blocks together by rows, starting from the left side. When all rows are sewn, stitch rows together top to bottom.
- Border 3 Top layout is as follows:
- Border 2 Top layout:
- Using the pattern cover, complete the layout.
- The outside (4th border) is cut from fabric #7. The top and bottom will need to be across the fabric and along the grain line for the sides.
- The corners have been cut just for fun (refer to finished project image). Quilt as desired and finish off with a double binding. The quilt finishes at a 69" square so is more of a wall hanging. A sleeve was attached on the back for hanging.
2/06
|


