|
 Stitching and stuffing are the basics for creating this delightful, soft-sculptured shape. Using the right tools and a little imagination will make it a fascinating project. Stitching and stuffing are the basics for creating this delightful, soft-sculptured shape. Using the right tools and a little imagination will make it a fascinating project.
Materials
- ½ Yd. Unbleached Muslin
- Polyester Fiberfill
- Americana Acrylic Paints – Taffy Cream, De Lane’s Dark Flesh, Mississippi Mud, Raw Sienna.
- Americana Faux Glazing Medium
- ¾” Wide Flat Brush
- ¼” Stiff Flat Brush
- Round Stenciling Brush
- Spray Sealer, Matte
- Sanding Pad, Extra Fine
- 8” Piece of Embroidery Floss or Twine for Hanger
- Dritz® For Dolls Perfect Pointmaker
- Dritz® For Dolls Stuff-It II™ Stuffing Tool
- Dritz® For Dolls Sculpting Needle, 3”
- Dritz® For Dolls Nylon Thread
- Dritz® For Dolls Fine-Point Disappearing Pen
- Dritz® Sharps Hand Needle, size 9, to stitch opening closed
Sewing Thread to match fabric
- Dritz® Safety Pin, size 2, to hang moon while paint dries
- Paper Towels
- Scissors
- Pattern (pdf)
This project is specific to a particular brand of sewing machine, notion, fabric and/or supply. However, the project may be easily adapted to other brands.
A |
|
B
|
C |
D |
E |
F |
G |
|
Note: You can purchase a yellow fabric and eliminate Steps 7 & 10. If you do so, then do not purchase Taffy Cream, Raw Sienna, Faux Gazing Medium, Spray Sealer, Sanding Pads and ¾” Brush.
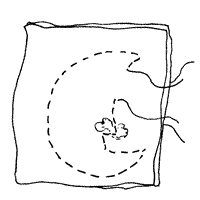
1. Use pencil to trace outline of pattern onto doubled muslin. Pencil lines will be stitching lines.
2. Stitch around outline of moon, leaving 2” opening, adding a small amount of stuffing to the corner of the nose. Stitch right over the stuffing. This will help to keep stuffing in the nose area while you are stuffing it, figure A. Trim around stitching, leaving ¼” seam allowance. Clip curves.
3. Use the Perfect Pointmaker to turn moon right sides out. Use the Fine Point Disappearing Pen to draw sculpting lines for nose on both sides of moon. Use the Stuff-It II Tool to stuff carefully, using one hand to flatten the moon as you stuff. Hand-stitch opening closed with a needle and thread.
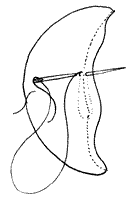
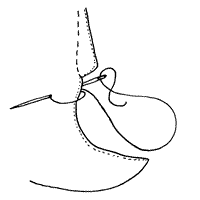
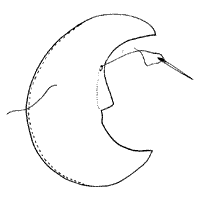
4. Use the Sculpting Needle to sculpt nose as follows: Insert the needle into the cheek area, exiting from the line at the top of the nose, figure B. Take a small stitch, and insert the needle into the same side, exiting from the opposite side, figure C. Insert the needle just below the exit point, passing through the nose area, and exiting just below the first insertion point. Go back and forth, all the way down the nose, pulling the thread slightly to indent the stitching, Figure B, C, and D.
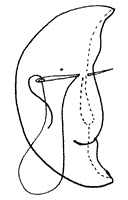
5. Exit needle from side of mouth, take a small stitch, and bring thread around to opposite side, push through to first exit point, figure D. Repeat, and exit from inner corner of eye area. Take small stitch and pass through to opposite side of face, exiting from inner corner of eye area. Repeat two times, then repeat entire step for outer corner of eye. Make a small stitch, and bury thread inside moon, Figure E.
6. Base paint entire moon with Taffy Cream. Let paint dry completely. Use a fine-grain sanding pad to smooth the painted surface. Apply a second coat of Taffy Cream.
Tip: Insert safety pin into the top seam of moon to use as a hanger while paint dries. You can suspend the pin from a piece of wire or thread.
7. Mix Raw Sienna with Glazing Medium, at a ration of 1:2, and brush onto moon. Don’t worry about even coverage.
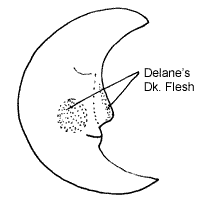
8. Use dry-brush method (round stencil brush) to apply De Lane’s Dark Flesh to cheeks and nose bridge areas of moon. To dry brush, dip brush into paint, rub excess into paper towel, until the paint has a powder-like quality. At this point, apply to cheek
area, using a circular motion. Use a light touch to begin, adding more pressure until you achieve the color your want, Figure F.
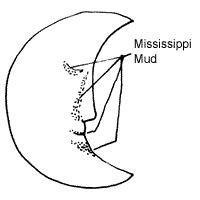
9. Use a stiff, flat brush to dry-brush Mississippi Mud to eye area, between the lips, under bottom lip, and side of nose, to give a hint of shadow, Figure G.
10. Spray with acrylic sealer and remove floral wire carefully.
11. Knot ends of 8” piece of twine, or use a piece of embroidery floss. Stitch to top of moon.
Tip: You can leave the moon as is, or make a night cap with a fabulous tassel, if you wish. Make several and add them to your Christmas Tree decorations for some extra magic!
5/06
|