|
 Any girl would enjoy having a medieval lady-in-waiting hat, whether for a Halloween costume party or just for dressing up and having fun. This style features a long, sheer veil that flows from the top of a tall crown. Any girl would enjoy having a medieval lady-in-waiting hat, whether for a Halloween costume party or just for dressing up and having fun. This style features a long, sheer veil that flows from the top of a tall crown.
For the boys, the same hat without the veil would be a great crowning touch for a wizard costume. For additional embellishment, celestial shapes could be appliquéd to the crown.
You Will Need
- 3/4 yd (0.68 m) medium-weight fabric, at least 45"-wide (115 cm), for crown and brim
- 5/8 yd (0.68 m) medium-weight fusible interfacing
- 1-1/2 yd (1.37 m) light-weight sheer fabric, up to 45"-wide (115 cm), for veil
- Grosgrain ribbon, 1"-wide (2.5 cm), with length equal to circumference of head plus 2" (5.1 cm), for hat without veil
- 1 yd. (0.9 m) narrow ribbon, for ties
- Jumbo cording
- Light-weight cording, such as pearl cotton
- Wooden dowel, 1/4” (0.6cm) in diameter
Making the Pattern
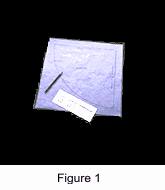
For the crown of the hat: Measure the circumference of the head oosely, just above the ears. Multiply this measurement by 4, and divide the answer by 6.28. Draw a quarter circle with this radius. The straight edges are center back of the crown. Figure 1.
To develop the brim: Divide the head circumference measurement by 6.28 to determine the radius of the inner brim. Draw a circle with this radius. Draw another circle from the same center point with a radius of 1" (25 cm). Figure 2.
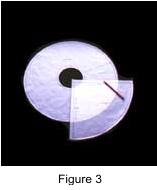
To finish the brim pattern: Add 1/2" (1.3 cm) seam allowances to all curved edges. Add 3/4" (1.9 cm) seam allowances to center back edges of the hat crown. Figure 3.
For the veil: Draw an arc with radius of 1” (2.5 cm) from point of crown and trim away.
Cutting Directions
Cut one crown from the fabric, using the above pattern. For the brim, cut a strip of fabric 6" (15.2 cm) wide using the full width of the crosswise grain of the fabric. Cut a piece of jumbo cording, with the length equal to the circumference of the head plus 8" (20.3 cm). Cut one crown from the interfacing.
How to Sew
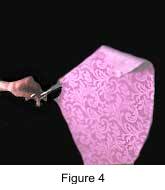
1. Fuse interfacing to crown of hat. Stay stitch 1/2" (1.3 cm) along upper and lower curves, machine sewing with short stitches. Clip upper seam allowance to stitching line every 1/4" (0.6 cm). Figure 4.
2. Turn down the upper seam allowance, rolling stitching line to wrong side; press. Stitch 1/4" (0.6 cm) from pressed edge, securing seam allowance to crown.
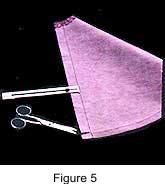
3. Stitch center back seam of crown, right sides together, stitching 3/4" (2.0 cm) from raw edges. Clip seam allowances to stitching line, 5/8” (1.6 cm) above lower curved edge. Figure 5.
4. Stitch seam allowances together, from clip to upper edge, 1/8” (0.3 cm) from raw edges. Pivot and stitch to seamline, 1/4” (0.6 cm) from top; backstitch to secure. Press seam allowance to one side. Press seam allowances open below clip.
5. Stitch short edges of brim strip together into a continuous circle, leaving a 3” (7.6 cm) opening at center of seam; press seam allowance open. Divide circle into fourths and mark.
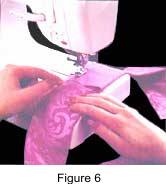
6. Fold circle in half, having long raw edges match, wrong sides together. Zigzag over a cord, stitching 3/8” (1.0 cm) from the raw edges. Figure 6.
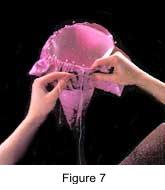
7. Divide the lower edge of crown into fourths and mark. Pin brim to crown, right sides together, matching marks, pulling up on cord to distribute gathers evenly. Stitch 1/2” (1.3 cm) from raw edge. For hat without veil, omit instructions and references to veil in following steps. Figure 7.
8. Finish one cut edge of veil, using overlock stitch or narrow hem. Run two rows of gathering stitches within the 1/2” (1.3 cm) seam allowance on opposite cut edge; divide edge into fourths, and mark.
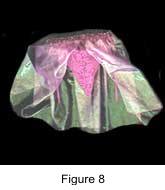
9. Pin ribbon ties at side marks, if desired. Pin veil to lower edge of hat, matching marks; align selvages of veil to back seamline of crown. Pull up on threads to distribute gathers evenly. Stitch 1/2” (1.3 cm) from raw edges. Trim seam allowances of veil and brim. Figure 8.
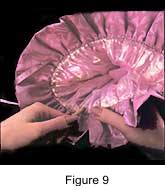
10. Turn veil, seam allowances, and ribbon into crown. Pull veil through inside of hat and out hole at top of crown. Edgestitch through crown, seam allowances, and veil, just above the brim, keeping back crown seam allowances free. Figure 9.
11. Cut dowel 3/4” (1.9 cm) shorter than length of center back seam; insert dowel into space between stitching lines on crown seam. Tack opening closed.
12. Wrap ends of jumbo cording with tape. Insert cording through opening in brim; butt ends and hand stitch together through tape. Hand stitch opening closed.
|