*June Tailor Computer Printer Fabric and a Wimpole Street Creations doily were used in the sample project.
Instructions
1. Working on your computer, enlarge or reduce each photo image to fit a 4½ x 5½ inch rectangle. Follow the manufacturer's instructions to print the photos onto the photo-transfer fabric.
2. From each printed fabric photo, cut a 4½ x 5½ -inch rectangle. From yellow fabric, cut four 1x5 ½ -inch and two 1x14 ½ -inch strips. From green fabric, cut two 1½x14 ½ -inch strips. And from pink fabric, cut two 3½x14 ½ -inch strips.
3. To make the pillow, sew all seams right sides together using a ¼ -inch seam allowance. Press seams to the sides with less bulk.
4. Sew the 5½ -inch yellow strips between the photos and the outer vertical edges of the photo block. Sew the 14½ -inch yellow strips to the top and bottom of the photo block. Sew the green, hen the pink strips to the top and bottom edges.
5. Tea-dye the doily, dry and press flat. Cut the doily in half diagonally to make two triangles. Cut the ribbon in half and weave t through the crochet openings on each doily triangle.
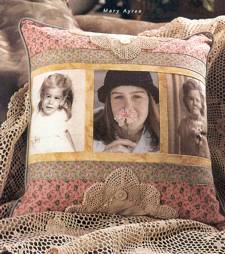
6. Refer to the photo to pin the doily triangles centered on the top and bottom of the pillow top. Let the cut edges extend just beyond the pillow top edges, and then trim the doily edges even. Slipstitch the crochet edges in place and baste the cut edges to the pillow top.
7. Sew a button to the fabric corner of each doily triangle.
8. Sew the piping around the pillow tip, ¼ -inch from the edge. Begin and end in a bottom corner and clip the corners as you sew.
9. To finish, cut a 14 ½ -inch square pillow backing. Sew the front to the back along the piping stitching, leaving a 12-inch opening along the bottom edge. Turn right side out. Insert the pillow form and slipstitch the opening closed.


 Materials