 Materials and Supplies Materials and Supplies
- Commercial shirt pattern
- Lightweight linen-look fabric (check pattern for yardage requirements)
- Lightweight tear-away stabilizer for embroidery rows
- Brother sewing machine
- 50 weight Brother poly thread for embellishment: wisteria (607) used on sample project
- Size 5 perle cotton for pin tucks and fagotted edges
- 60 weight thread for pin tuck bobbin
- Sewing thread
- “J” and “N” feet
- Pin Tuck foot SA174 for 7 mm machines, SA162 for 5 mm machines (such as PE300S and PE400D)
- Buttonhole sewing “M” and buttonhole “A” feet
- Spray starch
- Washable pen or chalk
- Eight 1/2” buttons
Note: Stitch numbers refer to the ULT machine, but similar designs are available on most machines.
These project instructions are specific to a Brother machine; however, the project can be adapted for use on other machines.
Preparation
1. Lightly starch and press fabric.
2. In the area of fabric you plan to cut the two front pieces, mark the center front along the straight-of-grain using chalk or washable pen.
3. Lay the front pattern on fabric, aligning the center front of the pattern with the line just marked on fabric) and draw around pattern with a washable pen or chalk.
4. Turn pattern piece over and prepare the second front.
5. Cut out both fronts, allowing 1” extra around each shape.
6. On each front, mark the first row of pin tucks by drawing a line 1” away from the center front mark, and approximately 15” long. Draw five more lines, each 1/2” apart and each 1” shorter than the previous line.
Front Embellishment
1. Using one or two layers of thin tear-away stabilizer under the second, fourth, and sixth graduated lines, work a stitch of your choice using the “N” foot and Brother polyester thread, starting above the marked cutting line. For the sample, stitch 8-41 in small size was used. Use the single star setting to complete a full design at the end of each row. Tear away the stabilizer.
2. Change to the 2.0 mm twin needle and the centered straight stitch. Add a second spool of thread, and thread both needles. If using cording, switch to the pin tuck bobbin cover (SA174 only) and insert cord. Or, tape a small straw in front of the machine to guide the cord.
3. For the sample, stitch 1-04 (with a 2.0 mm length and tension of 9) and size 5 perle cotton worked well to make corded pin tucks for the weight of linen used. Experiment with your machine and fabric until you get good results.
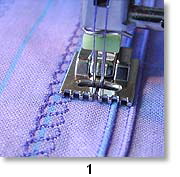
4. Starting at top edge of fabric, stitch following the longest marked line. Leave a thread tail to later tie off the pin tucks on the wrong side. Stitch the next row (towards the body of the garment), guiding the previously stitched line in the second groove for SA174, or outer grooves for SA162. Leave a thread tail for each row. (Pin Tuck foot SA162 has five grooves rather than 7 as with SA174. SA162 with batiste-weight fabric and size 8 perle cotton works well on the PE3005 and 400D machines.) See Photo 1.
5. When embellishment is complete on both front sections, pull threads to the back of the pin tuck rows and tie by hand. Remove marker lines and press.
6. Place pattern on the embellished fronts and cut out, making sure the pin tucks are parallel to the straight-of-grain marks and in proper alignment with the center front. Cut out back and collar. Cut out and apply iron-on interfacing to front facing and collar according to pattern.
Sleeve Embellishment and Assembly
1. For fagoted corded sleeve trim, cut six strips 2-1/4” wide x 14” long. Mark the center of each strip along the length and work a set of three corded pin tucks down the center of four strips – these pin tucks should be compatible to those on the shirt fronts. Remove marker lines and press pin tucks. Press back 1/2” seam allowances along each long edge. Press under 1/2” seam allowances along the length of the fabric from which you will cut the sleeves.
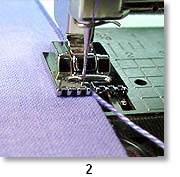
2. With the pin tuck foot on the machine and a single needle of thread, test your fabric and settings to cord the edges. The sample used stitch 1-10 (zigzag) at 2.0 mm wide and 0.8 long. Lay a length of size 5 perle cotton (or size 8 on SA162) on top of the folded edge and place under the pin tuck foot so that the needle swing to the right goes over the fabric/cord edge and the needle swing to the left catches the fabric. Use matching thread in the bobbin. Couch a cord to the entire length of the folded edges. See Photo 2.
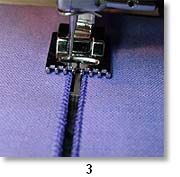
3. Select a bridging stitch like 2-11 (feather) at default setting (5.0 mm x 2.5 mm). Lay the two corded edges in the second-from-center row on each side of the foot. See Photo 3.
4. Sew two groups of three strips with the plain one at the bottom. Experiment with various stitches such as 2-12 (fagoting cross), 2-10 (smocking or honeycomb), 3-8, 3-17 or 3-19 (hemstitching), and different colors of perle cotton and different thread for varying effects.
5. Place the sleeve pattern on the fabric with the three-strip unit next to the corded edge to aid in positioning the sleeve trim. Sew the strip to the main fabric with the feather stitch (2-11) or whatever bridging stitch you used on the band.
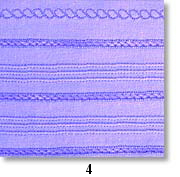
6. If desired, work the chain design (8-41 small) down the middle of the last strip and above the top strip to finish the sleeve. This will embellish the lower sleeve and reflect the front design. See Photo 4.
7. Because the lower edge of sleeve has been finished with the corded edge, fold back the lower 5/8” seam allowance on the pattern before measuring and cutting the sleeve. Cut the sleeves.
8. Carefully trim the corded seams close to the couching for a clean finish.
9. Follow the pattern to assemble the shirt, using sewing thread.
10. Work the buttonholes with foot “A” and sew on the buttons with foot “M” with the thread shank extended, if your linen is not very thin. Press and enjoy!
Project by Early Irwin, Educational Consultant for Brother International,
1/06
|