Free Sewing & Craft Projects, Learn to Sew, Guidelines Articles, Charitable Projects, Bridal, Kids & More

sewing and craft projects at www.sewing.orgsewing and craft projects at www.sewing.org


Find a Sewing Teacher
Guidelines for Sewing
line_menu


Baby & Toddler
Bridal Sewing
Charitable Sewing
Dolls, Toys, Games
Fashion Sewing
Fun Projects
Home Decor
Jewelry
Kids Projects
Men's Sewing
Pets
Pillow Projects
Purses, Bags, Totes
Quilt Projects
Teen Projects


Christmas & Winter
Halloween
Thanksgiving
Other Holidays
line_menu


My Sewing/Craft Room
SEW-lutions Blog
line_menu


Advertise With Us
Contact Us
Newsletter Sign-Up
line_menu


Body Form Booklet
Sewing Gifts


spools_thread

Sewing & Craft Alliance


Sewing & Craft Alliance


sewing.org
nationalsewingmonth.org
trainedsewinginstructor.com
sewtrendy.com
 

Holiday Projects

Project provided courtesy of:

Wrights ©

Santa Doll

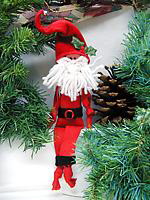
This doll is so easy to create! They are 10 to 12" tall and look great on a tree branch, a wreath or a shelf. Santa is always welcome anywhere!

Materials

  • 1 pkg. Wrights® Scarlet Bias Hem Facing
  • 1- 6" Square Red Felt (Kunin Felt)
  • 1 Scrap of Pink Felt
  • 1- 12" x 1/2" Black Felt
  • 1 oz. White Yarn
  • 1 Red Chenille Stem
  • 1 Button (for belt buckle)
  • 2 Small Holly Leaves
  • 3- 5mm Red Pom Poms
  • 1- 8mm Jingle Bell
  • Polyester Fiberfill (small amount)
  • Fabric glue
  • Miscellaneous Supplies:  Scissors, Ruler, Sewing Machine or Needle and thread, Pins, Pencil, Black and white acrylic paint, Plastic lid or palette, Black permanent fabric marking pen, Powder blush, Toothpicks and Craft picks
  • Pattern

Instructions

Body

  1. Cut one 10" piece of Hem Facing. Fold right sides together.
  2. Open out seam allowance on each side and machine or hand stitch on the fold line.
  3. Leave bottom edge open. Turn right side out.
  4. Stuff firmly with fiberfill.
  5. Turn raw edges in, pin opening closed and set aside.

Legs

  1. Cut one 12" piece of Hem Facing.
  2. With wrong sides together, fold in half lengthwise.
  3. Tie a knot at each end for the feet.
  4. Fold to find the center and cut the piece in half.
  5. Insert the legs into the bottom opening of the body with folded edges facing the center. Stitch or glue into place.

Arms

  1. Cut one 10" piece of Hem Facing.
  2. Fold and tie knots following same procedure as for legs.
  3. Measure and mark 1" down from the top of the head on each side seam. With the
  4. folded edge facing forward, center the arm over the side seam.
  5. Place the top edge of the arm at the mark.
  6. Fold the raw edge over 1/4" and pin in place. Hand sew or glue each arm in place.

Face

  1. On the pink felt, trace a circle using a quarter or the bottom of the paint bottle as a template.
  2. Cut out the circle and glue onto the head.
  3. Brush cheeks on with blush.
  4. On the plastic lid or palette, make a tiny puddle of both the black and white acrylic paint.
  5. Dip the small end of the craft pick into the black paint and dot on one eye at about the center point of the circle.
  6. Dip and dot the second eye.
  7. Draw a small nose with the permanent marking pen.
  8. Dip the end of a toothpick into the white acrylic paint and add a tiny white highlight to each eye.
  9. Set aside to dry.
    Note: The face may be drawn with the permanent marking pen.

Hat

  1. Cut chenille stem in half, reserve the other half for another project.
  2. Fold square of felt in half.
  3. Pin hat pattern on the fold and cut out.
  4. With the hat folded in half, place a line of glue along one long edge and glue the edges together. The seam will be on the outside.
  5. Slide the chenille stem into the back of the hat along the seam so one end goes up into the point of the hat.
  6. Position the hat on Santa with the back seam centered and the edge to line up with the top of the arms.
  7. Place glue on the back of the head only, and glue the hat in place.

Beard

  1. Cut three 4" pieces of yarn and set aside.
  2. Wrap yarn around three fingers six or seven times. Slip the yarn off your fingers.
  3. With one of the 4" pieces, tightly tie a knot around one end to form a tassel.
  4. Make two more in the same manner.
  5. Glue one tassel on each side of the face so that the ends extend up under the hat.
  6. Glue the third tassel to the center front of the face.
  7. Cut two short pieces of yarn, tie a knot in the center and glue under the nose for a mustache.
  8. Cut the yarn loops and trim as needed.
  9. Adjust the front of the hat around the beard and glue into place.

Finishing Touches

  1. Attach bell to tip of hat with needle and thread.
  2. For the belt, glue 1/2" strip of black felt around the waist and glue button on for buckle.
  3. Glue strip of black felt around each leg for top of boot.
  4. Glue two holly leaves and three tiny pom poms for holly berries onto hat. The chenille stem enables the hat to be bent in any whimsical way. 

by Florence Bolen Tebbets
12/07

Back to Holiday Projects
 

www.sewing.org
Privacy PolicyCopyright, Reprint, Linking