|
 A cape is a dramatic and very versatile costume element. Distinguished royalty, wizards, magicians, and witches can benefit from the use of a cape. In its simplest form, a cape is a circle of fabric that is tied at the neck and open down the front. An inexpensive cape can be made with minimal sewing, using felt. A cape can be made with or without a collar, and both are secured at the neck with ribbon ties. A cape is a dramatic and very versatile costume element. Distinguished royalty, wizards, magicians, and witches can benefit from the use of a cape. In its simplest form, a cape is a circle of fabric that is tied at the neck and open down the front. An inexpensive cape can be made with minimal sewing, using felt. A cape can be made with or without a collar, and both are secured at the neck with ribbon ties.
The length of cape can be varied, depending on the desired look. Fabric can be pieced to acquire a circle with the necessary diameter for a long cape. If you want to avoid piecing, the circle diameter must be no more than 72” (183 cm).
You Will Need
- Felt or other fabric
To determine the amount, see “Cutting Directions” below
- Single fold bias tape
- 1 yard (91.4 cm) ribbon for ties
Cutting Directions
Cut a square of felt or other fabric twice the desired length of the cape, plus about 3" (7.6 cm).
How to Sew a Cape With a Collar
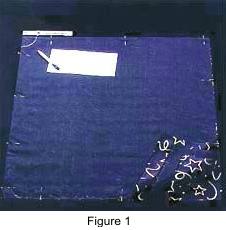 1. Fold square of fabric for cape in half lengthwise, then crosswise. Pin layers together. Measure around base of the wearer’s neck. To find the radius, divide measurement by 3.14; then divide result by 2. Mark an arc on fabric for neck opening, measuring from folded center of fabric a distance equal to radius, using straightedge and pencil. Figure 1. 1. Fold square of fabric for cape in half lengthwise, then crosswise. Pin layers together. Measure around base of the wearer’s neck. To find the radius, divide measurement by 3.14; then divide result by 2. Mark an arc on fabric for neck opening, measuring from folded center of fabric a distance equal to radius, using straightedge and pencil. Figure 1.
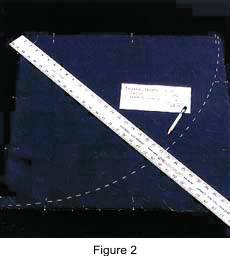
2. Mark an arc for lower edge of cape, measuring from folded center of fabric a distance equal to the desired length of cape, plus measurement of radius determined in Step 1. Figure 2.
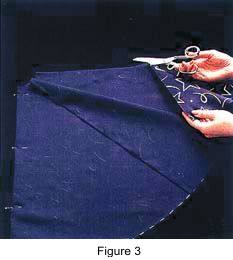
3. Cut on marked lines through all layers. Cut along one folded edge; this will be center front opening of cape. Figure 3.
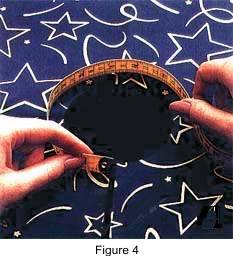
4. Measure the distance around the neck edge of cape from center front to center front, 1/2” (1.3 cm) down from the neck edge. The rectangle for the collar should be this length. The collar width can range from 2” to 4” (5.2 cm to 10.2 cm). Cut out a rectangle for the collar from leftover fabric. Figure 4.
5. Stay stitch around neck edge of cape, 3/8” (1.0 cm) from raw edge. Clip neck edges of cape to stay stitching. Pin-mark middle of collar and center back neck edge of cape.
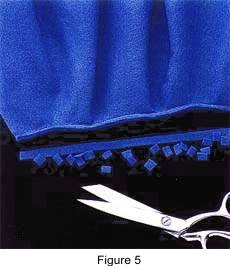
6. Pin collar to cape along neck edge, right sides up, positioning ends of collar even with center front edges, and matching pin marks. Stitch collar to cape 1/2” (1.3 cm) from raw edges. Trim seam allowances to scant 1/4” (0.6 cm). Figure 5.
7. Cut bias tape to length of seam of neck opening, plus 1” (2.5 cm). Open one fold of bias tape. Pin bias tape to wrong side of cape along neck edge, aligning tape fold line to stitching line; extend bias tape 1/2” (1.3 cm) beyond edges at center front. Stitch on fold line.
8. Turn under the 1/2" (1.3 cm) of bias tape at each end. Fold bias tape over seam allowances; pin. Stitch close to tape edge, encasing seam allowances. Finger-press encased seam allowances toward cape at center fronts and pin.
9. Cut ribbon for ties to desired length. Turn under 1/2” (1.3 cm) on one short end; pin to cape front, 1/2” (1.3 cm) from edge at center front, centering over neck seam. Stitch tie to cape close to edges and along edge at center front.
 How to Sew a Cape Without a Collar How to Sew a Cape Without a Collar
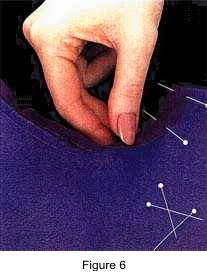
1. Follow Steps 1 through 3 above. Cut bias tape to length of neck opening, plus 1” (2.5 cm). Open one fold of bias tape. Pin bias tape to right side of cape around neck edge, aligning raw edges; extend bias tape 1/2” (1.3 cm) beyond edges at center front. Stitch bias tape to neckline, stitching on fold line. Figure 6.
2. Press seam allowances toward bias tape. Clip the neck seam allowances as necessary. Turn under 1/2” (1.3 cm) of bias tape at each end. Fold bias tape to wrong side of cape and pin. Stitch close to remaining fold in bias tape. Follow Step 9 above, pinning ties to center front at neck edge.
10/03
|