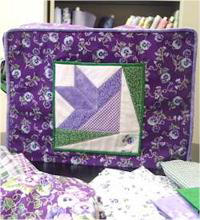
This sewing machine cover can be made for any size and any type of machine. Make a matching set for your sewing machine, serger, and embroidery machine! Instructions to make the Floral Quilt Block are also available.
Take Measurements
Measure the sewing machine, and use the larger number of any common areas – for example, if the bottom width measures 11” and the top width measures 10”, use 11” for the measurement. Remember to include the hand wheel in your measurements.
A = measurement of width across the top and bottom B = measurement of height C = measurement from front of the machine to the back of the machine D = measurement from bottom, up the side, over the top, and down the other side Add the following to your measurements: 1” seam allowances (1/2” per side) + 3/4” ease + 1” hem.
Fabric Requirements
Use the Marcus Brothers R13 Pansies & Ivy fabric as noted below or fabric of your choice.
1 yard Pattern 1031-177D – purple spaced pansy
For optional cording: 1/4 yard T461-177D – lilac texture (The amount of cording you will need is equal to 2 times the measurement of D.)
10” square of fabric backing
Cut
1 front and 1 back, as per measurement A x B
1 center band, as per measurement C x D
2-1/2 yards of 1/4”-thick cording
2-1/2 yards x 4” wide strip of straight grain fabric for cording
Instructions
NOTE: All seam allowances are 1/2” unless otherwise noted.
1. Fold and press 1” hems on the back, front, and center band. Do not sew yet.
2. If using the floral quilt block as a pocket: Center the finished quilt block on the front piece. Have the bottom of the block at least 1-1/2” from the folded hem edge. In the center of the quilt block top, pin out about 1/2”; this will allow for a little wiggle room in the pocket. Attach the block to the cover by stitching in the ditch of the binding seam around all except the top edge.
3. To make cording, fold up and press 1/2” hem on cording fabric at both ends. Cover cord with fabric right side out. Use a zipper foot to stitch close to the cording. Trim seam allowance to 1/2”. At each end, pull out about 1/2” of cord and cut off.
4. Attach cording to front piece and the back piece, starting at the pressed edge of the hem. Clip cording fabric when turning the corners to make it lie flatter.
5. Matching pressed hem edges, attach back and front to the center band. Stitch together.
6. Pin hems in place and stitch from cording to cording, backstitching at the beginning and the end.