|
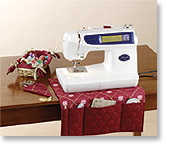 Use decorative stitches to enhance these useful sewing room accessories. A basket with a decoratively stitched liner holds thread and notions. A pretty case protects your favorite scissors. And the caddy slips easily under your machine and provides pockets for your most frequently used tools. Use decorative stitches to enhance these useful sewing room accessories. A basket with a decoratively stitched liner holds thread and notions. A pretty case protects your favorite scissors. And the caddy slips easily under your machine and provides pockets for your most frequently used tools.
Finished Sizes:
- Caddy is 18" x 19"
- Scissors cover fits up to 9" shears
- Basket cover is adjustable.
Materials and Supplies
- 1-1/2 yards of burgundy cotton fabric, 44/45"wide
- 1 yard of burgundy quilted cotton fabric
- 1-1/2 yards of fusible stabilizer
- Burgundy all-purpose sewing thread
- 2 yards of decorative gold 1/2"-wide ribbon
- Gold metallic heavy braid
- One 1" plastic ring
- One 3" gold tassel
- Fabric marking pencil
- Brother Gold #999 metallic machine embroidery thread
- Brother rayon decorative machine threads in light and dark shades of each pink and green
- Brother Pacesetter
For all three projects, use 1/4" seam allowances.
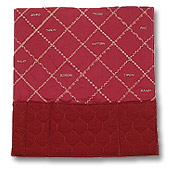 Caddy Caddy
1. Cut one piece 20" x 28" from each burgundy fabric and the fusible stabilizer.
2. Fuse stabilizer to wrong side of non-quilted fabric piece. Mark decorative stitch guidelines using fabric pencil as follows. On long edges, measure down 20”, and draw a line across the shorter width (you now have a 20” square marked). Draw lines from corner to corner, forming an X across the square. Mark edges at 3" intervals and draw diagonal lines using these marks.
3. Using built-in decorative stitches and metallic gold thread, stitch along each diagonal line, forming diamond shapes.
4. Using built-in alphabets and metallic gold thread, stitch sewing words (see example) at center of desired diamonds. Decorate remaining diamonds with built-in embroidery designs and rayon threads. Note: Rose design on photographed project is from Brother embroidery card No. 20.
5. Place embroidered piece and quilted piece right sides together, and stitch around edges, leaving an opening for turning. Clip corners. Turn. Press. Stitch opening closed.
6. Fold up end with no decorative stitching approximately 7" to form pocket. Pin in place. Topstitch around entire piece 1/4" in from edge.
7. Stitch vertical lines to divide pocket into various sizes.
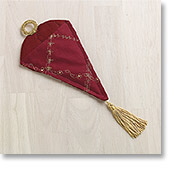 Scissors Pocket Scissors Pocket
For Scissors Pocker, draw triangle pattern according to illustration. Cut out patterns for front and back.
1. Cut two scissors pocket fronts from plain burgundy fabric and two scissors pocket backs from quilted burgundy fabric.
2. Fuse stabilizer to wrong side of one pocket front piece. Decorate piece with built-in stitches in same manner as caddy.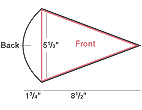
3. Right sides together, stitch pocket front pieces, leaving a small opening for turning. Trim seam allowance at point. Turn right side out. Repeat with pocket back pieces.
4. Matching bottom point, place pocket front and back pieces together. Topstitch 1/4" in from side edges.
5. Cover ring with metallic braid. Tack ring to top edge and tassel to bottom point.
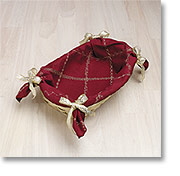 Basket Cover Basket Cover
1. Measure depth and width of basket and total these numbers. Add 4" to this total. Measure the depth and length of basket and total these numbers. Add 4" to this total.
2. Using dimensions from last step, cut two pieces from non-quilted burgundy fabric and one piece from stabilizer.
3. Fuse stabilizer to wrong side of one cover piece.
4.Decorate stabilized piece in same manner as caddy.
5. Place pieces wrong sides together and serge edges; OR stitch pieces right sides together leaving an opening, clip corners, turn right side out, stitch opening closed, and edgestitch.
6. Place cover in basket. Pull one corner at a time and tie with 10" piece of ribbon.
Project by Barbara Tucker, Senior Education Consultant
Reprinted with permission from www.SewingSavvy.com.
9/05
|


