|
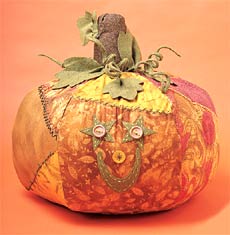
 This soft, stuffed pumpkin is a cheerful addition to your autumn and Halloween décor. Feel free to make it in any fabric combination. This soft, stuffed pumpkin is a cheerful addition to your autumn and Halloween décor. Feel free to make it in any fabric combination.
Approximate Crafting Time: 3 hours
Skill Level: Sewing experience helpful
Materials
- 7 pumpkin-colored calico fat quarters
- 1 brown calico fat quarter
- 1/2 yard green felt for leaves and vines
- scrap of orange felt for nose
- chenille stems
- two 1" buttons for eyes
- three 16-ounce bags of fiberfill
- embroidery floss, perle cotton
- basic sewing supplies, glue
- Patterns
Directions
1. Enlarge pattern pieces (pumpkin and leaves) 250 percent.
2. From one calico fat quarter, trace and cut out circle for pumpkin bottom.
3. Trace and cut out 6 pumpkin sections from remaining calico fat quarters. If desired, stitch several smaller pieces of calico together in a crazy-quilt style. Embroider as desired.
4. Stitch/embroider face on one pumpkin section.
5. Stitch pumpkin sections right sides together, leaving an opening to turn; the stem piece will cover opening.
6. Stitch circle to bottom, easing where necessary. Turn and stuff.
7. Cut out stem piece. Stitch right sides together. Gather short ends of stem, pull gathering threads tightly, and tie off. Turn stem right side out and stuff lightly.
8. Turning raw edge of stem under 1/4", stitch stem to top of pumpkin.
9. To make vines, cut several 2” x 12” lengths of felt. Fold felt around chenille stem. Stitch close to chenille stem, and trim close to stitching. To make vine curly, twist felt-covered chenille stem around a dowel or marker. Glue vines to top of pumpkin.
10. Trace pumpkin leaves on felt and cut out. Stitch small tuck at rounded end of leaf as desired to create dimension. Glue or stitch to top of pumpkin.
Please read all instructions prior to beginning; read and follow all manufacturers' instructions for all tools and materials used. Provide adult supervision if children participate in this and all craft projects. Because Jo-Ann Stores, Inc. and joann.com have no control over the use of materials and tools, nor surroundings, during construction of projects, Jo-Ann Stores, Inc. and joann.com disclaim any liability for injury, damage or other untoward results. Content of this project sheet is presented in good faith, but no warranty is given, nor results guaranteed.
9/04
|

