For best results, fuse just one layer of felt at a time.
Possibilities
Make a cover for a journal to take along on your trip. Or, enlarge the patterns to fit a larger album.
Materials
Mini photo album, 6 ½ x 6 ½ x 2 inches
Felt*: 36-inch crystal blue, ½ yard; gold; antique white; pumpkin; copper; pirate green; soft beige; baby blue; royal blue; cranberry, one 9x12-inch sheet each
Lightweight paper-backed fusible adhesive*, ½ yard
Embroidery floss*: dark carmine rose (44); cobalt blue (129); medium cobalt blue (131); dark delft blue (150); dark parrot green (258); medium dark topaz (308); dark bark (352)
On the paper backing of the fusible adhesive, draw a 7x15 ¼-inch rectangle. Cut out leaving a small margin around the rectangle. Follow the manufacture’s instructions to fuse the rectangle to crystal blue felt; cut out on the lines. Note: This will be the album cover lining.
Remove the paper backing and use a pattern to cut another 7x15 ¼-inch crystal blue rectangle for the album cover. From the remaining crystal blue felt, cut two 2 1/2x7-inch cover flaps.
Trace the appliqué patterns from the pattern section onto the paper backing of the fusible adhesive. Cut out leaving a small border around each piece. Fuse to the appropriate color felt, then cut out on the lines.
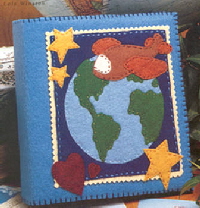
Place the unfused album cover horizontally on the work surface. Refer to the photo to position and fuse the outer background square onto the album cover, 5/8 inch from the top, bottom and right edges. Continue to fuse the remaining appliqués in the following order: inner background; globe; land pieces; hearts; stars; plain; wings; tail sections; window.
Stitch Chart
Running Stitch Up at odd, down at even numbers for specified length
Blanket Stitch Down at 1, up at 2, with thread below needle; pull through.
Refer to the Stitch Chart and use four strands of floss for all embroidery stitches. Work running stitches just inside the edges of each appliqué, except the outer background. Stitch as follows: dark carmine rose (44), hearts; medium dark topaz (308), stars; dark bark (352), entire plain; cobalt blue (129), globe; dark parrot green (258), land; medium cobalt blue (131), inner background.
Fuse the album cover lining to the wrong side of the album cover. Align and pin the sleeve flaps to the ends of the album cover lining. Work 1/8-inch blanket stitches around the album cover edges, stitching the flaps to the cover. Carefully slide the cover over the album.
Lois Winston 2001
*Kunin Rainbow Classic Felt™ Therm O Web HeatnBond®Lite fusible adhesive; and Anchor embroidery floss were used in the sample project.