 Under the sea Playhouse & Fishing Game Under the sea Playhouse & Fishing Game
Transform an ordinary card table in to a fabulous undersea world for kids to enjoy. Includes a fishing game
Supplies
- 72" wide felt: Aqua: 2-1/2 yds
- 36" wide felt:
- Green: 3 yds
- Black, gray: 1 yd each
- Brown, tan, pink, orange, yellow: 1-1/2 yds each
- HeatnBond Ultra, 10 yds
- Wiggle eyes
- Pearl & gem embellishments
- Dowel rod, two 18" pieces
- String
- 2 Magnets
- Paper clips
- Self-adhesive felt numbers
- Scissors
- Iron & ironing board
- Fabri-Tac glue
- Large newsprint pad (for patterns)
- Ruler & pencil
- Circle template (optional)
- Download Instructions and Patterns
Directions
- Standard card tables are 28" high, 34-35" wide; therefore, 72" felt -- 2-1/2 yds cut lengthwise -- should provide 2 panels that span the card table both ways. Cut the 2 panels, trimming the sides and bottom as necessary for a good fit.
- On one side, cut a flap 16"W and 20"H. Over this, you will be bonding the large porthole and fish, etc., sealing off the flap cuts. When the table is completed, cut the flap again, through all thicknesses.
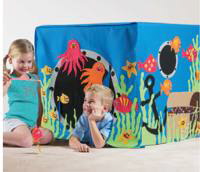
- Using the photo as a guide, cut the pattern pieces and set aside. Most pieces are attached to the felt house with HeatnBond, following manufacturer's instructions. Begin with the bottom layer of each element -- ex.: large gray porthole, smaller black circle, black bolts, green seaweed, octopus, octopus cheeks, octopus mouth -- and build up one layer at a time, for a good bond. Note: when attaching seaweed with fish, etc., bond the bottom of the seaweed, leaving the tendrils free until fish are placed, so some appear to be intertwined. Elements such as the Wiggle Eyes, gems and pearls are attached last, using Fabri-Tac.
- All the fish begin with either a basic circle or oval; simply add tail, fin and other details.
- The treasure chest is made of 5 felt pieces. Attach the tan trunk base, the brown shape above it, then the tan lid. Attach the brown end pieces last. Glue gems and pearls.
- Fish game on top: Paint two 18" dowels in coordinating colors and set aside. Knot the ends of two pieces of string and attach the knot to the top of the magnet with tacky glue. Cut 2 small felt circles and 2 worms. Cut a small "x" at the center of the felt circle and slide it over the unknotted end of the string. Settle it onto the magnet glue and glue the worm on top. When glue is dry, tie unknotted ends of the string to the dowel. Glue the knot to the dowel, and trim the string. Cut small fish, apply Heat ?n Bond and iron to another piece of felt; trim edges, leaving a margin of the second color felt. Glue on eyes, apply felt numbers on back and slide a paper clip on each fish's mouth.
Fishing Game Ideas
Learning basic math & spelling skills: (a) take turns "catching" fish; add up the scores at the end. Highest score wins. (b) Catch 2 fish and add the numbers together. (c) Catch 2 fish and multiply the numbers. (d) Catch 2 fish and subtract the smaller number from the larger number. (e) Teach the concept of "0," which is tricky for most children. (f) Teach the concept of "odd" and "even" numbers. (g) Make each fish a different combination of colors and play a Memory Game, remembering what number is on the back of each fish. (h) Instead of numbers, make 26 fish and place letters on the back to teach the alphabet. (i) Place the letters that spell out the children's names on the back, and help them learn to spell their names.
Design Suggestions for Other 2 Sides
- Repeat one or both of the original 2 sides.
- Cut another flap on the back side that looks like an underwater cave. Cut the flap into narrow strips so children can pretend they're entering through a "waterfall."
- Cut out the side porthole window just inside the black line for a peep hole. Make one for each of the remaining sides.
- Hang some fish on the underside of the card table. Suspend them on ribbons, fastened by Velcro dots.
- Create some accessory pieces to play pirates or scuba diver.
- To close up the corner gaps, cut small strips of felt (to tie) or small rectangles (to attach with Velcro, one to each side of the gap).
- Attach pockets for holding the fish and fishing rod pieces.
Directions
- Enlarge all patterns approximately 800%. This will vary depending on how you print out pattern. See measurement on flower pattern A to determine your enlargement. Place pattern A on fold of pattern paper and cut out one whole flower pattern.
- Cut with right sides together:
- Pattern A, 2 dark yellow
- Pattern A, 1 batting
- Pattern B, 2 dark yellow
- Pattern B, 2 light yellow
- Pattern C, 2 green
- Note: sew all seams 1/4" to 3/8" from edge.
- With wrong sides of flower pieced together and batting between layers, sew all around.
- With wrong sides of petals pieced together, sew around each set. Make sets of one light and one dark yellow petal.
- With wrong sides of stem pieced together, sew around all stem pieces, adding some batting for dimension, if desired.
- Layer all pieces as pictured. Pin in place and sew around outside edges.
|


