These project instructions are specific to a Brother machine; however, the project can be adapted for use on other machines.
1. Choose a ready made blouse or shirt to embellish. I chose an inexpensive mens tuxedo shirt purchased at a local craft store, to convert into a holiday blouse.
2. Insert decorative buttonhole pattern disc into your machine. Choose number 12 motif or whichever size needed for your particular size button on your garment.
3. Depending on the size of the decorative buttonhole, use the appropriate size embroidery hoop. These decorative buttonholes cannot be embroidered with the buttonhole frame. With the larger hoop you may be able to do more then one motif with just the one hooping.
4. Cut your stabilizer and organza/netting to fit the embroidery frame you chose. The larger embroidery frame will easily fit 3 sets of 3 embroidered motifs. Far leftcenterfar right. Top---center---Bottom of the hoop.
5. Embroider as many motifs to match the number of buttons there are on your garment, including the cuffs.
6. Remove from hoop, cut and trim close to the motif. With very small scissors, very carefully clip open the buttonhole portion of the design.
7. Place in water to remove the stabilizer, pat dry with a towel and set aside to dry thoroughly.
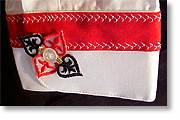
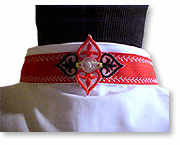
Extra embellishment can be added to your garment by adding ribbon, bias tape, or decorative stitching to the collar and cuff of the blouse. I added red bias tape and further embellished with a decorative stitch built into the Brother ULT2003D machine. #7-04
By duplicating the steps above using a different motif (#9) and changing thread color to black, red, and gold, a new version of the blouse can be created.